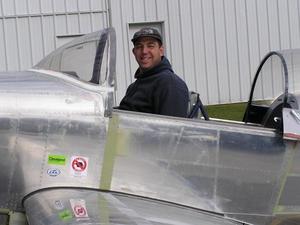
Forward Baggage Bay Door Support
- Details
- Written by Kevin Horton
- Hits: 4057
The basic design does not have anything to support the forward baggage bay door in the open position. This would be a real pain, as it would mean you would have to hold the door with one hand, which would only leave one hand to deal with loading or unloading things. Some folks make a support rod, somewhat similar to the one that props the hood open on many smaller cars. Some folks use a gas strut. I liked the folding support arm that I first saw on Randy Lervold's site.
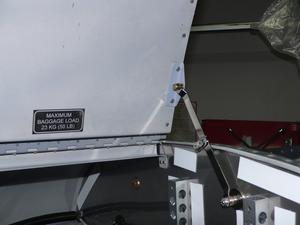 One day a few weeks ago Terry and I looked for a folding support arm in the aviation section of Home Depot. But they didn't have anything at all. They said that Lee Valley Tools probably carried what we needed. Terry likes that place, so she volunteered to go have a look. A few days later she went there and asked for two, but it turned out that there are two in each package, so she ended up with four (all their stock is in a warehouse - you fill out an order form, give it to a staff member, and a few minutes later they come back with your stuff). She had purchased lid stays, designed to support the lid of a wooden trunk.
I started messing around with them, to figure out how to mount one. At first I didn't like the bend near the end, so I tried to straighten one out, but ended up destroying it. One down, three to go. The pivot in the middle is a bit stiff, so I experimented with the broken one to see how to loosen up the joint. I then tried to loosen the joint on the second one, but overshot the mark, making it too loose to use. At this point I was glad she had purchased four of them.
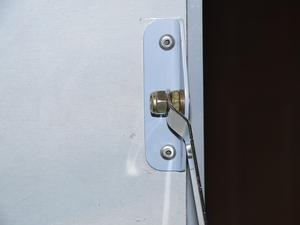 I pop-riveted a mounting bracket to the door, and discovered a perfectly placed bolt on the firewall that could be used to mount the other end. I need to buy a slightly longer screw for the top end to pivot on.
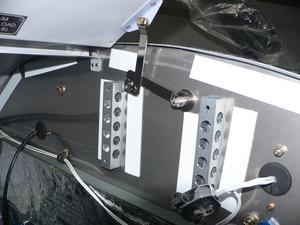 The support arm just fits between the two mounts for the electronic ignition box - the arm will fold into the small space between the electronic ignition and the firewall. I didn't mount the electronic ignition directly on the firewall, as I didn't want to subject it to too much heat.
HS & VS Mounted
- Details
- Written by Kevin Horton
- Hits: 3842
Things have improved a bit since my last report of "One of Those Weeks", but my luck is still not completely back to normal. Early this week I decided it was time to permanently install the horizontal and vertical stabilizers. I removed them, and prepared the various spacers for priming. My can of zinc chromate didn't work - drat. Wednesday at lunch time I drove over to the closest Canadian Tire to pick up a new can of primer. As soon as I got home I zipped down to my basement paint shop to prime the spacers, so they could dry while I was eating. But this brand new can of primer just gave a very short "Psst", then stopped. Nothing would get it going again. Drat. Terry was out for the evening, so after eating I decided to head to the closest Canadian Tire to pick up another can - but they were out of stock. Back in the car to the next closest Canadian Tire, and bought two cans, to improve the odds that at least one of them would be good. The whole exercise of driving around to purchase primer consumed 75 minutes. Grrr.
Back home, primed the spacers, and went to check e-mail while the primer dried. Then, I put the horizontal stab in place and started to bolt it in place. I had expected that I would be able to put nuts and washers on the front four bolts by sticking my arm down through a hole in the top of the rear fuselage, then sticking it forward through a hole in the 811 bulkhead, then reaching up and back to put the washers and nuts on the bolts. I managed to get the washer and nut on one bolt, but my wrist wasn't limp enough to do the other three. And I got my arm stuck in that hole in the top of the rear fuselage - it took several minutes of twisting to get it out.
So, I realized that I would have to crawl into the rear fuselage to get at those bolts. I grabbed three washers and nuts, and climbed into the cockpit. I noted that the battery (mounted on the bottom of the fuselage behind the aft baggage compartment) was in the way, but it would take several minutes work to remove it. It looked there was enough room to crawl over it, so I decided to give it a go. I managed to get over the battery, and crawled downhill into the rear fuselage. I got the washer and nut on one more bolt, but found that the other two bolts tended to push up when I tried to get the nuts on. Drat. I needed to find a way to hold those bolts down.
Got to crawl out the rear fuselage. Uphill. I got to the battery, but couldn't manage to roll over onto my stomach. My leg kept getting caught on the battery, which prevented me from rolling over. I eventually had to crawl over the battery on my back - my back still hasn't forgiven me for that. I took five minutes to remove the battery, which is what I should have done in the first place.
I stacked some bucking bars on top of the bolt heads to hold them down, and crawled back into the rear fuselage. I got one more washer and nut on, then dropped the fourth washer, and it bounced way back out of reach. Drat. Crawled back out of the fuselage, and grabbed a whole hand full of washers and nuts. Back into the rear fuselage, and got the last washer and nut in place. Time for a beer, to sooth my aching back.
The next evening, Thursday, Terry held a wrench on the bolt heads, while I crawled back in the rear fuselage with a torque wrench to tighten the nuts.
Jerry Esquenazi - First Flight
- Details
- Written by Kevin Horton
- Hits: 4241
Jerry Esquenazi made the first flight in his RV-8 today. Jerry started building about the same time I did. We've communicated by e-mail and telephone a whole bunch of times, and I've met him at Oshkosh a few times. It is great to learn that he finally got flying.
Here is the message he posted on the Yahoo RV-8 Group:
Hey Guys,I finally had my first flight today after 9 years 7 months! It was awesome! The weather was good, a high ceiling, calm winds, and about 45 deg F. I had done a couple of taxi tests in the days past. Today I just taxied out, did my run-up and let her rip! During the first couple of seconds I had some propeller surging, but by the time I got around to making the decision to abort, the surging was gone and I was airborne! I climbed to 5500' circling over the airport. Initial numbers looked pretty good. 177 mph IAS at 24" and 2450 RPM 7 deg C OAT, without wheel pants and intersection fairings. GPS seemed to correlate: 150 kts upwind and 178 kts downwind. CHTs were all about 325 except #4 which was 285 with the mixture rich. I forgot to lean it out the first 15 mins of flight! Oil temp was 182 during the climb. I checked it out through the entire speed range and performed some stalls. Flaps up stalled at 60 mph indicated and flaps down about 56 mph. I had a slightly heavy right ring requiring a couple of bars of left roll trim. The ball was centered favoring the left line. I had offset the vertical stab about 5/32" during building, so I guess it worked! Finally I practiced some landing approaches and it was time to land. Not a greaser, but respectable. I was airborne about 45 min. The only squawk is my G-meter. I must have forgotten to unlock it after I put it in the panel. It was a blast! I wanted to go up again in the afternoon, but frankly I was spent. Tomorrow will be a prettier day. My wife was busy with the video camera and she was also manning our 3 year old son, so I don't have any still pictures of the flight itself but here are some ground pics with the famous RV grin. I'll see if I can post the video on YouTube . The runway is about 6500' long, so during the actual takeoff and landing I was kind of far from the camera. We'll see if we can get some better pictures and footage next flight. Thanks for everyone's help. I couldn't have done it without the help of my online friends, Kevin Horton, the late Phil Arter, Danny King, Bill Vondane, Brian Denk, Mark Navratil, and many many more. You guys are the best!
Jerry Esquenazi
N84JE Flying!!!!
One of Those Weeks
- Details
- Written by Kevin Horton
- Hits: 4407
This has been one those weeks where seemingly everything you touch turns to crud. I've had days like that before, but never a run like the last few days.
It started last Friday, when a planned C550 training flight, which was supposed to have several instrument approaches and touch and go landings, was fouled up by a landing gear indication problem. You really shouldn't do a bunch of touch and goes if one of the landing gear won't indicate down and locked. It was only a burnt out light bulb, so we got back home and on the ground without incident.
Saturday, I was spraying some fogging oil in the engine's cylinders to prevent corrosion. The aerosol can has one of those little red straws that goes in the spray nozzle. I had stuck the straw in one of the spark plug holes, and was spraying away when suddenly fogging oil started going all over the place. I released my finger, and saw that the straw was gone. Got a flashlight, and sure enough you could see it down in the cylinder. I tried fishing it out with a piece of safety wire, but no luck. It is now one more item on my To Do list. It'll be easier to get when I pull the bottom plugs and turn the prop over before the first engine start.
Sunday I had the incident with the inverted oil system tank - see below.
Tuesday I tried to install the prop oil governor line, but the fitting on the governor pad wasn't at the best angle. The oil line couldn't get the best shot at the fitting, but I tried anyway and managed to cross thread things. I removed the fitting, and sure enough, the threads were a bit messed up. I was able to recover Wednesday morning with a half hour's work using a triangular needle file to sort out the threads.
Wednesday I took a day off work so Terry and I could go skating on the Rideau Canal. We had a very nice lunch at the Canal Ritz, then went down on the canal to put on our skates. I've got a rather old pair of skates - old enough that I am no longer sure when I bought them, but it was at least 15 years ago. They have a plastic outer shell, with an inner boot. As I was putting them on a piece of plastic popped off the toe of the right skate. Then another piece broke off near one of the lace eyes. Then the skate split open where the outer side joins the sole. I knew that some plastics lose strength as they age, but I had never seen a demonstration like this. I tossed the skates in the nearest garbage can and walked along side the 40' wide part that the skaters were using as Terry had a nice skate. Oh well. It was a nice day for a walk.
Hopefully this string of bad luck has run its course.
Tim the Tool Man Strikes Again
- Details
- Written by Kevin Horton
- Hits: 4722
Today was one of those days where I should have just stayed in bed.
Today I reinstalled the front portions of the engine baffles, which I had removed so I could modify the cylinder wrap-around parts. I also took the opportunity to enlarge the hole where the prop oil line comes through the right front baffle. The original hole I made wasn't big enough, as I hadn't allowed for the retaining clamp on the end of the firesleeve.
After reinstalling the baffle, I decided to install that oil line, now that it would fit through the hole in the baffle. I quickly discovered that I had a problem. There wasn't room for it to go under the cylinders, because one of the hoses for the inverted oil system was in the way. I had intended for that inverted oil system hose to have a different routing, but I hadn't allowed for the effect of the firesleeve. After installing the firesleeve, I found that the hose was now too short to use the planned routing, as the firesleeve pushed it further way from the oil sump as it came around a corner. So, I put it above the sump, below the cylinder. Now that decision had screwed up the routing for the prop oil line.
So, the inverted oil line has to go back to its originally planned routing. I could make a new, longer hose, but I would have to order more hose, and that stuff is expensive (about $60 for the hose, $30 for firesleeve and $3 for firesleeve clamps, plus taxes and shipping). Plus it is a real PITA to put the ends on the hose. Then I had a brilliant idea. I should have learned now to beware of brilliant ideas, but some folks never learn. I noted that the fitting on the bottom of the inverted oil system tank, where the problematic hose installs, was not in the centre of the tank. It was towards the aft end of the tank. I could rotate the cylindrical tank in its mount, and that would move the fitting towards the front of the aircraft. A quick check showed that this would allow the hose to go back to its originally planned routing, making room for the prop oil line. Great. I'll save a few dollars because I won't need to order $100 of hose.
But, because I planned to rotate the tank in its bracket, the angle of the fittings on the top and bottom would now be wrong. I would need to remove those fittings, and reinstall them at the new angle. Off comes the tank, put it between my knees, put a wrench on the top fitting, and twist. Nothing. Harder. Nothing. That fitting is really in tight. Grab the heat gun, to heat up the tank, which will cause it to expand a bit - that worked. Top fitting came out.
Now for the bottom fitting. Same problem. Try heat. I can't keep the tank from turning between my knees. So, I grab another wrench and put it on the fitting on the side of the tank, so I can keep the tank from turning. These are long wrenches, so I have lots of leverage. Leverage is good. Finally I get the bottom fitting out, and I am happy.
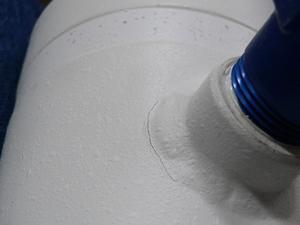 Then I look at the tank. I put so much force on the side fitting, to keep the tank from turning, that the weld is cracked, and the tank is bent. Arrgh. Tim the Tool Man strikes again.
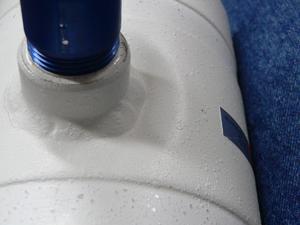 Here you see the deformation around the fitting in the side of the tank.
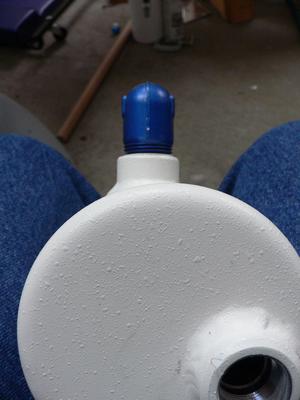 The fitting at the top of the picture was originally coming straight out of the tank, with a line through the fitting going straight through the centre of the tank. Now you can see how the fitting is canted off to the right, due to the deformed tank.
Off to the Aircraft Spruce web site to price out a new inverted oil tank - $384.95!! Ouch. All so I could save less than $100 of hose. Arrgh. Maybe I could get the tank straightened out and re-welded. The powder coating would have to be ground off, which risks thinning out the aluminum. It would look like crud afterward. And, if this tank fails I'll lose a whole bunch of oil, which could lead to engine failure or a fire. It isn't worth risking a $100,000 aircraft, and our lives to try to salvage a $400 tank.
I sent an e-mail to Raven Aircraft, to ask them if their inverted oil tank is compatible with the Christen system, and to get a price. The Raven system is reputed to work just as well as the Christen system, and it is apparently quite a bit cheaper. Plus they have an optional smaller diameter tank that may help my space issues.
Needless to say, I didn't get any more work done today after the tank tragedy. I'm drinking a beer right now, and I think I'll drink several more.
Modified Cabin Heat Muff 2
- Details
- Written by Kevin Horton
- Hits: 5948
I've knocked off a bunch of smaller items on the big To Do list over the last 10 days. I also spent hours poring over catalogs figuring out where to order a bunch of hardware items I need. No one place has everything I need, so it is a real trick to figure out how to split up the orders to minimize the total cost, including shipping.
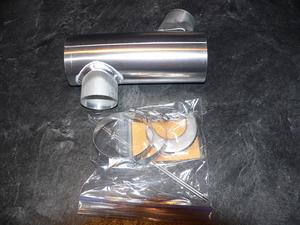 I also spent some time to install the beautiful custom heater muff that Rick Robbins made me. The muff is 7" long, and has the inlet and outlet on opposite sides. It will fit on the front left exhaust, just below the cylinder.
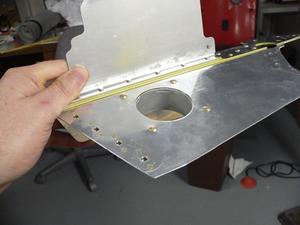 I had to remove the front baffle floor to install the flange for the air inlet to the muff.
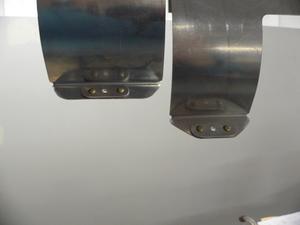 While I had it off, I realized that this was the best time to modify the parts of the baffle that wrap around the cylinders on the bottom. Several people with flying RVs have recommended that flanges on the parts that wrap around the cylinders be reinforced to ensure that the safety wire that pulls the front and rear ones together does not cut through the aluminum. I riveted some small doublers onto those flanges. I'll put a MD42BS monel body pop rivet in each flange and knock out the mandrel. The monel will provide a tough "grommet" to run the safety wire through to ensure it doesn't cut through the aluminum. I'll put some zinc chromate on the rivets to ensure I don't get any dissimilar-metal corrosion between the aluminum and the monel.
I wish I had learned about the desirability of modifying the flanges on the baffle wrap-arounds before I had installed the baffles on the engine. The right side baffles weren't too much trouble to remove, but the left side will be much more work. I'll have to remove the air inlet snorkel on the front, and oil cooler door on the rear.
