Plenum Chamber Fabrication
- Details
- Written by Kevin Horton
- Hits: 5350
I've got a very long list of little items to do, but the biggest single job left is to fabricate a plenum chamber cover for the engine cooling air.
The cooling air comes in the two air inlets, and is trapped by the vertical baffle pieces and the top of the cowling. The only way out is to go between the cylinder fins, or through the oil cooler. The vast majority of builders use rubber baffle seals to seal from the aluminum baffles to the top of the cowling. However, a fair bit of air escapes between the baffle seals and the top of the cowling. People who race aircraft often fabricate a solid plenum cover to go on top of the baffles. The fact that the plenum cover is sealed to the top of the vertical baffles means there is much less air leakage. This means that the air inlets can be smaller, and results in less drag.
I didn't originally plan to use a plenum chamber top, but the way I trimmed the cowling resulted in not a lot of clearance between the tops of the baffles and the cowling. It didn't look like there was enough room to fit rubber baffle seals. And, I had trimmed the cowling inlets to a smaller size than is used by most builders, so I need to be sure that all the air that comes in is used for cooling.
My initial plan was to make the plenum chamber top from fibreglas, but I got scared off by the high temperatures. I read about a Lancair owner with a plenum chamber who measured temperatures of over 250°F after shutdown, as the hot engine radiated its heat to the surroundings. The West Systems epoxy that I have been using has a glass transition temperature (Tg) of about 140°F. The glass transition temperature is the temperature at which the epoxy resin starts to transition from a hard glass-like state to a softer rubber-like state. Obviously I couldn't use West Systems epoxy for this job. I looked into other epoxies with higher Tgs, but they required curing at high temperatures to achieve the high Tg - not really practical. So, fibreglas was out, and aluminum was in.
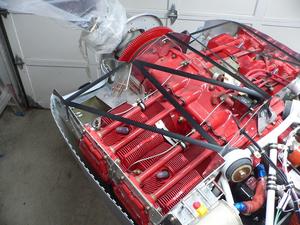 I started planning the details of the aluminum plenum chamber a week or so ago. Looking at the shape of the top, there was no way to do it in a single sheet of aluminum, as I can't do compound curves. I took some electrical tape to mark off a series of triangles. Each triangle marks an area that will be in a single plane, with a bend, or a riveted seam between triangles. There will be one area at the back on each side that will get a curve in one axis.
Earlier this week I fabricated flanges to rivet to the tops of the vertical baffles. The plenum chamber top will the screwed to nut plates in the flanges.
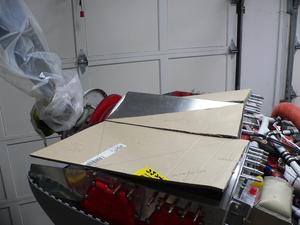 Today I started to fabricate the actual plenum chamber top. I started off by making cardboard patterns, to be sure to have the shapes right before I cut aluminum. The first piece of aluminum fit perfectly, and I got most of the rest of cardboard patterns made. This was going much, much better than I expected. I caught myself thinking how smoothly it was going, and then remembered all the other times I have thought the same thing. Usually a thought of how well things are going is the prelude to some disaster. Either I only think it is going well because I have overlooked some important complication, or I get complacent because it is going smoothly and then make a huge mistake. I decided to stop for the day before it all fell apart. I'll take a very careful look at the whole situation tomorrow, to be sure it really is going as nicely as it seems.
The Spirit is Willing, but the Body is Weak
- Details
- Written by Kevin Horton
- Hits: 3194
My body is revolting. My right elbow has been bothering me for several months - sort of a tennis elbow thing, except I don't play tennis. I assumed that it would sort itself out like 99.9% of the other normal aches and pains we get. But it never got better, and was slowly getting worse. I finally talked to my doctor, and he recommended physio-therapy. The physio is making quite a difference, but I need to back off on what I am doing on the project, to be sure not to aggravate the problem. Arrgh!
So, nothing that puts too much strain on the elbow, or lower right arm. No repetitive motions. No cleco pliers. No safety wire pliers. No tin snips. No sanding. Etc. Fortunately, there are many other things I can work on. I've done a bit more work on the paint scheme, and put some more cockpit control labels in. I've done some prep work on the engine cooling plenum chamber top.
Hopefully this will sort itself out soon, as I'm anxious to up the rate of progress.
Wing Tip Fit
- Details
- Written by Kevin Horton
- Hits: 4296
I had a list of things to look at on other RVs when I was in Oshkosh, to see what other builders had done, and to get an idea of what the typical quality was. One of my concerns was the alignment between the ailerons and wing tips. Ideally, the outboard edges of both ailerons would match up perfectly with the inboard edges of the wing tips. With both ailerons rigged in the neutral position, my right aileron matches up. The left wing tip sits about 3/16" above the aileron. This could be fixed with some major surgery on the fibreglas wing tip, but I wasn't looking forward to it.
My first wing tip data point was on the very nice 1998 Cessna 172 that I was a passenger in on the way to and from Oshkosh. On that aircraft, if one aileron was lined up with its wing tip, the other aileron was misaligned by about one inch, or about five times the misalignment that I have.
It was apparent from studying RVs at OSH, that many builders take great care to get perfect alignment between their wing tips and ailerons. But, many other aircraft have misalignments that is about the same as mine, and some aircraft are much worse. The easiest answer is to note that RVs are generally parked with the flaps in the down position, to ensure that no one steps on the trailing edge of the flaps when boarding the aircraft. I would be quite possible to simply raise the ailerons very slightly above the neutral line, so both of them line up with the wing tips. This would put them slightly higher than the flaps, when the flaps are up. I suspect that such a tiny rigging change would have no effect on the performance or handling.
The trailing edge of the left wing tip also extended about 1/4" further aft than the trailing edge of the aileron. I trimmed the trailing edge last weekend. This week I've been working on some areas on the left wing tip that are too low. I've also been fitting the rib that goes inside the aft part of the wing tip. I hadn't fitted that rib before, as it couldn't be done until I had made a decision on whether to modify the wing tip trailing edge to sort out the alignment issue.
This evening I worked to sort out the final fitting of the left wing tip trailing edge rib. When I fitted the right wing tip trailing edge, I noted that I needed some shims to make it fit the contour of the wing. Same thing with the left side. Tonight I did several rounds of fit and shim, but the fit was getting worse each time I added new shims. I finally realized that I had miscounted rivets, and was shimming in the wrong place. I finally figured out the right mix of shims, then primed them. I'll rivet the tip rib in place tomorrow.
Oshkosh 2006
- Details
- Written by Kevin Horton
- Hits: 3871
I got back Thursday evening from a great trip to the EAA fly-in at Oshkosh. I flew down with John, a co-worker, in his very nice 1998 Cessna 172. It doesn't cruise as fast as an RV, but it is faster than an RV that hasn't flown yet :). We left on Friday morning, overnighted in Menominee, MI. We could have made it to OSH on Friday, but we were getting pretty tired.
Saturday morning we did the last leg to OSH, after reviewing the arrival procedure (4.4 MB PDF) for the umpteenth time. Judging by the radio traffic, it had been fairly quiet before we arrived, but we managed to arrive at Ripon just as a group of 18 aircraft got there. There was a long line of aircraft coming from the SW, so we turned SW and kept going until we finally found a break in the line. We got in line OK, but an aircraft a few places further up couldn't seem to understand that he was supposed to fly at 90 kt and 1800 ft. The guy immediately behind him later told us that the problem guy would slow to 70 kt, then speed up to 120 kt, while varying his altitude by 500 ft or so. Needless to say this had a tremendous "domino effect" on the line of aircraft behind him. We stuck with it though, and it all sorted itself out on downwind.
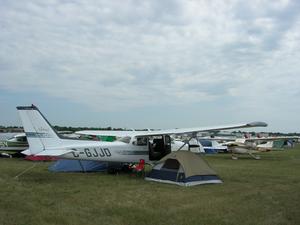 The taxi to the parking area only took a few minutes, then the fun began getting the aircraft tied down. There seemed to be a layer of bed rock about 8 inches underground, so it was a real SOB getting the tie downs in. I was just about spent when I finally finished that job. We got the tents set up, then the refueling truck came by, so we filled the plane up. One less thing to worry about later.
A while later we realized that the aircraft was venting fuel, and it was dripping on John's tent. Confirm the fuel selector is not on Both (that allows fuel to migrate from one tank to the other, and then out the vent). Move the tent. Still dripping fuel. Convince ourselves that it will stop soon, so we go find a bite to eat at Friar Tucks. Come back from Friar Tucks, and now there is a steady stream of fuel coming out the vent. Not good. Not good at all. We finally realize that we are on enough of a slope that the outboard end of the left tank (where the vent line is attached to) is lower than the inboard end of the left tank. So, it would keep pissing fuel until the fuel level was lower than the vent line. Arrgh!!
Fortunately, they hadn't parked any aircraft in the spots behind us yet. We moved the tents, untied the aircraft, then spun it 180 deg and moved it to one of the open spots behind us. Now the vent line is on the high wing, and the fuel stops dripping. But that meant I had to get the tie downs in again.
 Sunday we had a nice visit to the EAA Museum, and spent some time watching arrivals. There had been an accident in the morning, which forced an airport closure for a few hours, so there was a lot of traffic in the afternoon. It was impossible to get any details on the accident, but it was rumoured as an RV that did a stall/spin on the final turn, resulting in two fatalities. I was very bummed out about that. It turns out that it wasn't an RV, it was an Europa, which means I didn't know either victim, but it was still a tragedy.
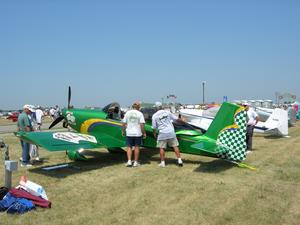 There were many outstanding aircraft, but this RV-8 certainly was one of the highlights. It took 16 months to paint the very detailed paint scheme.
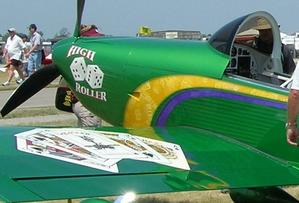 It is a bit hard to see here, but the trim lines down the fuselage were filled with faint air brushed images of the heads of the king, queen and jack from playing cards.
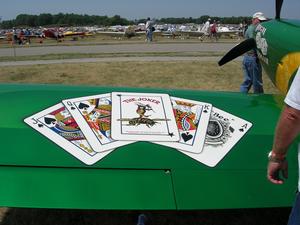 There were five playing cards air brushed on top of each wing.
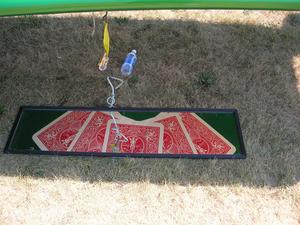 And on the bottom (image in the mirror), the back side of the playing cards was air brushed. The builder wasn't happy when I noted that the image on top of the wing showed the centre card on top of the five, but the image on the bottom of the wing showed the centre card on the bottom of the pile.
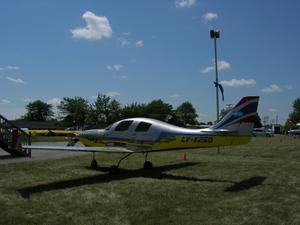 I was amazed to see that three Lancair IVPs had flown up from Argentina - a 5500 nm trip. Wow.
John wanted to leave on Wednesday, so that only left Monday and Tuesday to get everything done. We managed to get through most of the vendor areas, see most of the aircraft, and take in a few forums. We did so much walking that we were pretty much wiped every evening. There was a huge number of RVs - a very large gaggle in the RV parking area, plus as many again in the homebuilt camping area, plus a bunch more in the general aviation camping area. Most of them looked very nice, with a few really spectacular ones, and a very few really sad looking ones.
I ran into Don McNamara and Danny and Mary Jane King at Friar Tucks. Stumbled across Jerry Esquenazi near Aeroshell Square. Met a bunch of other guys at an RV-8 meet and greet at the Theatre in the Woods on Tuesday AM (thanks to Bob DiMeo for the donuts, and Don McNamara for name tags and markers).
We checked the weather on Wednesday AM, and there was a nasty bunch of weather around Sault-Ste-Marie, so we decided to stay one more day. That was what I wanted all along, as Bob Collins had organized an RV BBQ for Wednesday evening. Late Wednesday afternoon we got hit with a huge deluge - I haven't seen rain like that since I was crossing from Arizona to California on a motorcycle back in 1982. I was pretty worried about my $30 tent, so as soon as the rain stopped we walked back to the aircraft to check it out. And then I completely forgot about the RV BBQ. Too many hours in the sun, plus the worry about the tent floating away, and the BBQ was completely forgotten. Drat. Getting old I guess. It sounds like it was a very good time. Oh well.
Thursday we had a mostly uneventful flight back. The weather was good, and the only event was that after landing at Manistique, MI, we discovered that their gas pump had failed, and they couldn't sell us any fuel. A steady stream of aircraft arrived after us, all looking for fuel. Fortunately everyone had enough fuel to go somewhere else. I had hoped to go to Sudbury from there, but that plan went out the window. We had more than enough fuel to get to Sault-Ste-Marie, so it all worked out in the end.
Anonymous Comments Disabled
- Details
- Written by Kevin Horton
- Hits: 3596
Oil Temperature and CHT Calibration
- Details
- Written by Kevin Horton
- Hits: 5526
I have always wanted to check the calibration of the oil temperature and cylinder head temperature (CHT) sensors, as there are a number of ways that the indications could be in error. I could have a bad sensor, or a wiring problem, or I could have put the wrong values in EIS-4000 (each type of sensor has a different characteristic of voltage vs sensed value, so the EIS-4000 has to be programmed to match the type of sensor used).
Earlier today someone asked a question on the Yahoo Lycoming List about using boiling water to calibrate sensors. They were worried about the fact that the boiling point changes with altitude. That prompted me to find a table of water's saturation pressure vs temperature in an old copy of Steam Tables that I had when I was studying engineering. Now that I had collected the knowledge I needed, I decided to get the task over with.
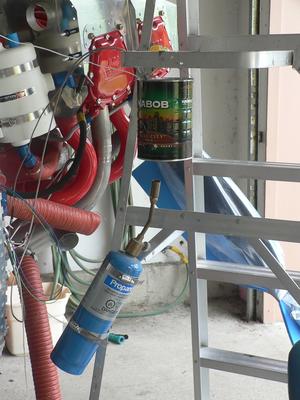 I removed the oil temperature and CHT sensors, and cobbled together a way to secure a propane torch below a metal coffee can. I put some distilled water in the can, inserted the sensors, and let the readings stabilize. Then I fired up the torch and heated the water. The oil temperature stabilized at 100°C, and CHT 1 and 3 both went to 98°C. I moved the water and torch over to the other side of the engine, and repeated with CHT 2 and 4 - they read 98°C as well.
The elevation of our house is about 375 ft. The altimeter setting reported by the closest airport was 29.81 inches of HG. The pressure altitude varies approximately 1000 ft per inch change of altimeter setting. Standard pressure is 29.92, giving a difference of 0.11 inch, roughly equivalent to 110 ft. Thus the pressure altitude was about 485 ft (the exact correction for altimeter setting gives 478 ft, so the rule of thumb isn't too far off). An on-line standard altitude calculator shows that the pressure would be 995.6 mb for a pressure altitude of 485 ft (that calculator agrees exactly with my calculations, so it can be trusted). A set of on-line steam tables shows that a pressure of 0.9956 bars (i.e. 995.6 mb) gives a saturation temperature of 99.5°C - i.e. the boiling point of water would be 99.5°C. So the oil temperature is reading bang on, and the CHT are more than close enough.
