Placards
- Details
- Written by Kevin Horton
- Hits: 4322
Transport Canada Airworthiness Manual Chapter 549 and the associated Airworthiness Manual Advisories require a number of placards in the cockpit and on the aircraft exterior. I had originally planned to use my Brother PT-2600 label maker to do the placards, but it only prints on tape 1" wide, or narrower, which was a bit tight for what I wanted to do. Last weekend I noted that Steve Hurlbut had used some sort of clear film to make placards in his aircraft. He put me on to 8.5" x 11" clear label stock that is sold in stationery stores. You print on it with a ink-jet or laser printer, then cut out the label and stick it on.
I spent several hours this week researching exactly what placards I must have in the cockpit, or on the aircraft's exterior. What must they say, how large must they be, and where must they be located. Then I messed around with several programs trying to make some good looking placards. I eventually ended up using Neooffice, which is a derivative of OpenOffice, a free office suite program available for many computer operating systems. It has a reasonably full featured drawing module that worked well for making the placards.
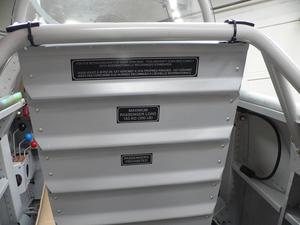 Here are the placards that are required to be visible from the passenger seat. The "Passengers Prohibited" placard will be removed once the aircraft has finished the official flight test phase.
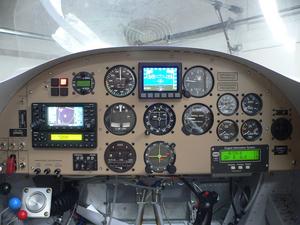 The instrument panel also gets a "Passengers Prohibited" placard, and it has an "Aerobatics Prohibited" placard, both near the top right. I'll need to follow the process in AWM 549.101A to remove the "Aerobatics Prohibited" placard.
Aircraft Spruce Canada
- Details
- Written by Kevin Horton
- Hits: 4003
Last Sunday morning Steve Hurlburt, an RV-7A builder from Kingston picked me up in Smith's Falls (CYSH), and we flew to Brampton (CNC3). He had arranged with one of the owners of Aircraft Spruce Canada to pick us up. We were late, as we had problems getting the self-serve gas pumps in Smith's Falls to pump gas, and then the headwind was a lot higher than expected. The guy who was waiting for us gave up and left a few minutes before we arrived. We wasted over an hour tracking him down, and having him come back to Brampton, but we finally got over to their facility, which is on the SW side of Toronto Pearson airport (CYYZ). Pearson is the major airport in Toronto, you need a slot time to get in during much of the day, and they really don't like light aircraft traffic, which is why we flew into Brampton.
Aircraft Spruce Canada is owned by the same guys who own Kitplane Builders, a builder assistance centre. The two facilities are right next door to each other, in an industrial park. In the past, if you wanted to purchase something from Aircraft Spruce, you talked to someone in the USA, and your order was packed and shipped from there. They have a large stock of items needed by homebuilt aircraft builders, but I stopped using them after they screwed up a couple of orders. But, Aircraft Spruce Canada opened in early December, and now orders can be packed and shipped from Toronto. They don't currently stock everything in the Aircraft Spruce catalog, but they do have several hundred of the most popular items. If your items are not in stock, they come up from Georgia in the weekly truck. Eventually, they hope to have a fully stocked warehouse at a general aviation airport in the Toronto area. They do have a retail front end to the current facility, with a lot of stuff on the shelves. So, if you are in the Toronto area, give them a visit. Just be warned that a visit is a bit like the $75,000 free ride that Van's will give you - don't visit the ACS Canada store unless you are prepared to spend some money. I went down with no plans to buy anything, but after browsing the aisles I ended up with a $250 pile of stuff that I had to have.
I'll try ordering stuff from Aircraft Spruce Canada. They were having problems with their 1-877 number - calls were being forwarded to Aircraft Spruce in Georgia. They hoped to have that sorted out ASAP. If 1-877-795-2278 isn't working, try 1-905-795-2278.
Anyone looking for builder assistance in the Toronto area should talk to Paul or Sean at Kitplane Builders.
Modified Cabin Heat Muff
- Details
- Written by Kevin Horton
- Hits: 8038
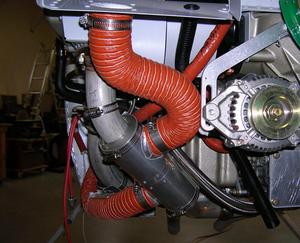 I had been beavering away on a modified heater muff - my original plan for the second heater muff turned out to be a non-starter, and I couldn't find a place to mount a standard heat muff. Another builder sent me pictures of his modified heat muff, which solve my problem. I got about four hours into the heat muff mod when I finally decided that it was a dead end, as there would be no way to remove the modified muff to inspect the exhaust pipe without drilling out a bunch of blind rivets.
This picture is not my aircraft, but it shows what I want to achieve. The standard heat muff has the inlet and outlet on the same side of the muff. I need a muff with the inlet and outlet on opposite sides.
The basic concept was OK, so I ordered a custom made muff from Rick Robbins. I just wish I had done this before wasting four hours modifying my original muff :(
Yesterday and today I finished about a half-dozen of the smaller items on my To Do List. I added about that many items to the list too, but all of them were items that I already knew about, but had just never bothered to write down before. I'm trying to put all known items on the list, rather than trust my memory to juggle them in my head.
We had a very nice visit from Jim Jewell, and his wife Chris (Kris?). Jim and Chris built an RV-6A in BC - he is waiting to receive the aircraft paperwork, and then the flight testing can start.
ELT Antenna Mount
- Details
- Written by Kevin Horton
- Hits: 6971
Progress has been frustratingly slow the last few weeks. Several trips on the road, for several days each, plus a bunch of things that needed doing around the house, all conspired to keep me out of the garage. The last couple of days I finally got back at the project, by having another go at the ELT antenna mount.
ELT antennae are supposed to be mounted on the top of the fuselage, as far aft as possible. The vast majority of aircraft have the ELT antennae sticking up from the rear fuselage somewhere. This won't work on the RV-8, as the canopy slides aft along the top of the rear fuselage. Some builders mount the antenna horizontally underneath the empennage fairing, directly below the vertical stabilizer, and between the root ends of the horizontal stabilizers. I didn't like that location, as the antennae pattern would probably be quite poor.
Many other builders put the antenna on the right rear arm rest, back beside the passengers right elbow, with the antenna running up the bulkhead at the passenger seat back. I had originally planned to use this location, but was troubled by the fact that the would very close to that bulkhead, which would also greatly compromise its radiation pattern.
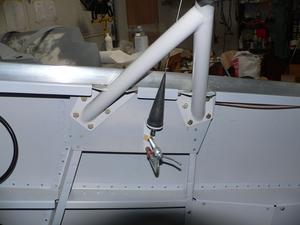 I spent quite a bit of time pondering things, studying the aircraft. I considered mounting it ahead of the windscreen, on the forward fuselage, but I didn't fancy staring at it all the time I was flying. I eventually hit open a possible mounting spot in the cockpit between the two seats, near the canopy rail. I saw one RV-8 at Oshkosh with the antenna mounted in this location, so that firmed up this as a possible location.
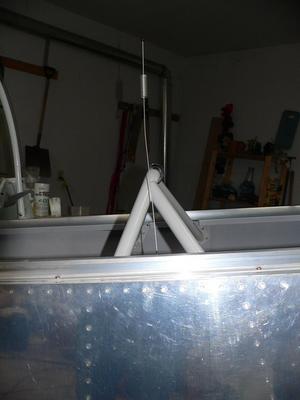 I fabricated a bracket on Sunday, and clamped it in place to see how it would work. I originally had it further aft, and leaning a bit aft, to keep it away from the pilot's right elbow. But, that put the antenna tip right in the passenger's face as he climbed into the aircraft. I had to move it forward, and stand it more upright, to keep the tip a safe distance from the passenger's head.
Yesterday I painted the mount, and today I drilled the holes for the mount, and the coax cable that goes to the ELT transmitter.
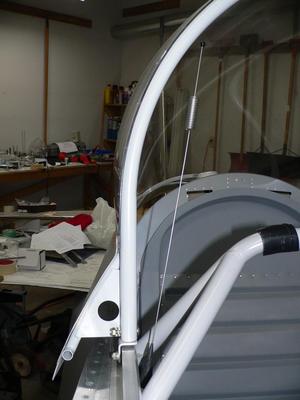 The top of the bracket is angled to lean the antenna a bit inboard, to ensure that it is not hit by the canopy frame as the canopy is opened and closed.
Fuel Tank Leak Checks
- Details
- Written by Kevin Horton
- Hits: 4084
I've been on the road much of the last three weeks - trips to Wichita and Vancouver. The few days I have been home I've made progress on a few small items.
I was waiting for the Proseal to cure after doing the fuel tank service bulletin. I've finished a leak check on one tank, and the other one is almost done. The first tank had no leaks, and I'm 99% sure the second one is OK (the water level in the manometer is down a tiny bit after a week, but that is likely due to atmospheric pressure variations).
Wing Leveler Mount
- Details
- Written by Kevin Horton
- Hits: 5894
I attacked several different jobs this week, but every time I hit a wall as I needed some small piece of hardware. Add it to the list and move on to the next job. I made some progress on the B&C alternator wiring - I got the field power plug assembled, but discovered that my original plan for the routing of the alternator output cable won't work, and the cable I have is a few inches too short for the routing I will use.
I removed one of the heat muffs from the exhaust. I have two heater boxes, and two heat muffs. I had a hard time finding a good place for one of the heat muffs, and eventually settled on a location that put the muff over a slip joint. There is a definite risk of CO coming through the slip joint and getting into the cabin, but I rationalized that my CO monitor would provide warning, and I could then turn off the heat. But, I was never really comfortable with this half-baked plan. I finally came to my senses, and recognized that putting the heat muff over a slip joint was a really, really stupid idea. So, I removed it, and put out a plea for ideas to the RV-8 List at Yahoo. Two alternative locations were offered. Someone promised to send pictures of how he routed the SCAT tune to a location on the front right cylinder's exhaust.
I started the leak test on the left fuel tank today. It'll be a few days before I know whether it holds air or not.
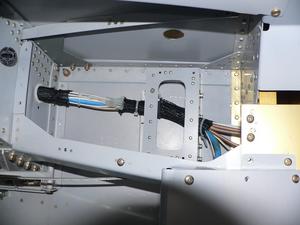 This afternoon I installed the mounting bracket for the wing leveler. There are a bunch of possible places to mount the wing leveler servo, and I chose a location under the mid-cabin cover on the right side. I borrowed the idea from Ray Lynn. I fabricated the mount a long time ago (details - one, two, three).
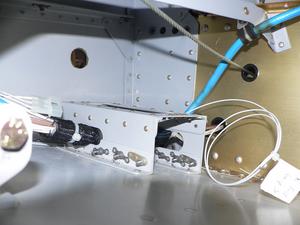 Installing the mount turned out to be much more difficult than I had anticipated, as there isn't a lot of room to work in that area. I could have really used some of those folks who assemble the mechanisms in DVD players. :) But, I finally got it screwed in place.
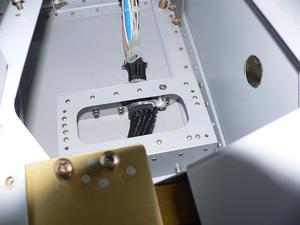 I even got the Adel clamp installed underneath to secure the wire bundle in place. That was a real trick, as there wasn't room to use hemostats to hold the clamp closed as I usually do. Fortunately, a couple of days ago I read a tip about using safety wire to secure a clamp closed so you could get the screw in - that worked great. Now I'm having a glass of wine to celebrate a small victory.
I'll install the servo tomorrow, but I'll leave off the rod that connects it to the control column. I won't install it until I am ready to start the wing leveler servo flight testing. I don't want it in place for the initial flight testing, as there are already enough risks to deal with - I don't want to have to worry about the servo doing something strange.
