Python Flight Test Data Scripts
- Details
- Written by Kevin Horton
- Hits: 3233
I was working on some Perl scripts to record flight test data. I got the scripts working for the engine monitor and EFIS, but I was having problems recoding data from the GNS 430. Then I got some unexpected assistance from Mike. He provided a much nicer data recording script, but we never got it working completely correctly. There was some sort of timing issue that screwed up the time sync between the various devices. I couldn't figure out how his script works - Perl code can be very inscrutable.
I eventually got interested in Python - it has a lot similarities to Perl, but the code can be easier to understand. I decided to have another go at the GNS 430 using Python. I got that working, then managed to to put together a single Python script that records data from the engine monitor, EFIS, GNS 430 and an event marker. Each of those data streams is saved to a separate file, at a selected rate, with each record annotated with the time so the data from the different devices an be time sync'd later. I've got another Python script that will be run post-flight to merge the four data files into one big file.
I will eventually make these new scripts available, but I need to do some more testing first.
Grinding away
- Details
- Written by Kevin Horton
- Hits: 3554
I've been slowly grinding away at the snag list, and doing a bit of fibreglas work. The snag list is down to 50 or so, plus bunch of To Do items.
Some days go well, but other days are a struggle to make any real progress. The flexible hoses are a good example. I got them pressure tested a few weeks ago, and then ordered the band clamps and clamp tightening tool I needed to put the firesleeve on. That stuff arrived on Thursday. Saturday I put the firesleeve on several hoses, and finished the ends of the sleeve with some red high temperature RTV silicone. Sunday I grabbed the first hose, to put it back on the aircraft. The hose I grabbed was part of the inverted oil system, and went from the front left corner of the oil sump, around the front of the engine, to the inverted oil system tank behind the engine on the right side. The additional diameter from the firesleeve meant that the hose didn't fit around some of the corners the same way, and I had a very tough time getting it hooked up - it wasn't quite long enough. I eventually had to rework the position of the inverted oil tank a bit to move it closer to the engine. It took about an hour.
Then I realized that I should inspect the inside of the hoses to be sure they were clean. They were clean before they were pressure tested, but I hadn't looked inside since. I grabbed a hose, held it up to the light and looked inside - it wasn't clean - it looked like there was some very fine grit. I looked at some more hoses - same thing. So, I removed the hose I had installed, and spent quite a while pulling some clean rags through the hoses with a piece of nylon cord to clean them. Monday I finally got that first hose back on, but I still have some work to do to properly secure the inverted oil system tank in its new position.
Slow Snag List Progress
- Details
- Written by Kevin Horton
- Hits: 3507
We spent the last several days of this week in Toronto, as Terry had a convention to attend. It made a nice break from Ottawa. The hard drive in my laptop died the night before we left, so there was a big panic the next morning to purchase a replacement hard drive, and perform the surgery to replace it. The old hard drive had been making strange noises for awhile, so I was expecting it to fail at some point, and had been making daily backups. So I didn't lose anything of importance, just a few hours time.
I've been slowly working down the list of snags. But I'm adding new ones to the list about as fast as I cross old ones off. It has finally warmed up a bit, so I've also done a few rounds of fill and sand on the various fibreglas parts.
The last really big job I need to do before taking the aircraft to the paint shop (other than finishing the fibreglas) is making the top for the engine cooling air plenum chamber. I've been putting off starting on this, as I hadn't figured out how I was going to seal the front of the plenum chamber to the cowling. You need a good seal there, or a bunch of the high pressure air that comes in the inlets won't actually be used to cool the engine. You incur a drag penalty for each bit of air that comes in the inlets, so if you want the maximum performance, you need to ensure that all that air is actually used to cool the engine. I think I've finally come up with a concept to seal the front of the plenum, and I've started doing a bit of work to confirm the concept will work. I'll start work on the plenum once I have confirmed the sealing concept will work.
Battery Tray
- Details
- Written by Kevin Horton
- Hits: 4644
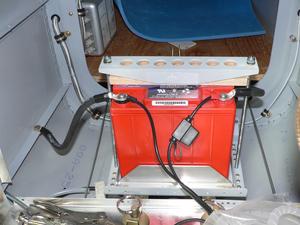
The battery tray was designed for a much larger battery than I will be using. I've got a standby alternator, so I only really need a battery that is big enough to start the engine. The stock design battery tray needed some modifications to be compatible with my smaller battery.
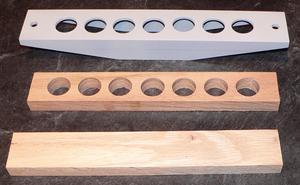
 The basic tray has a U-shaped channel that sits on top of the battery, with bolts to hold it down. The flat side of the U goes down, with the two ends of the channel pointing upwards. My battery is quite a bit narrower, so the terminals would be close to the U-channel, and there was some risk that the terminals could short out against the channel if the battery moved a bit.
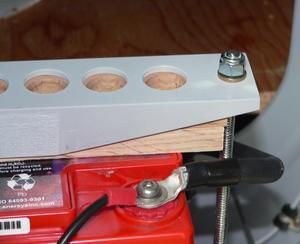
I decided to turn the channel over, so the flat side was on the top, and then trim the channel at an angle to make more clearance with the terminals. Putting the flat side up would have the channel only touching the battery on the edges, which would put a lot of pressure on a very small area. I trimmed some pieces of hard wood to fit inside the channel, to spread the load over a large area. The wood is non-conductive, so there is no risk of it shorting out the terminals.
 At the bottom of the battery, you can see one of the pieces of angle I bolted to the battery tray to make it fit my much narrower battery. This is a small gap at the end of the battery that I need to fill with another piece of hard wood.
 The bolts that came with the kit were a bit too short, due to the fact that I had turned the U-channels over to put the flat side on the top. I couldn't find longer bolts easily, so I used some threaded rod, and then applied some high strength LockTite to permanently attach some nuts to the top end.
The positive battery cable is about an inch away from the threaded rob, but there is some risk that it could move and chafe against the threads. I need to put a piece of rubber hose over the threaded rod to guard against that. One more thing for the snag list.
Closing Off More Snags
- Details
- Written by Kevin Horton
- Hits: 3320
I've had a moderately productive week. I didn't get as much done as I had hoped, but you never do. I spent quite a bit of time working on items on my snag list, and even though I found a bunch of new items to add to that list, it is 20 items shorter than it was a week ago. I also got in two rounds of sand the fill on the upper and lower gear leg intersection fairings.
Closing Off Snags
- Details
- Written by Kevin Horton
- Hits: 3966
I've been beavering away a few hours each day on the project. Monday I collated all the snag lists I've created since the start of the project. Any time I found a problem that I couldn't fix right away, or if I stopped a job part way through, I would record it on a snag list, so I would be sure to fix it later. This list covered many pages, with most of the items marked off as already completed. I decided to go through all the pages of the list, and transcribe them into an Excel spreadsheet that I could load onto my Palm PDA. It turned out that there were 75 open items on the list. I started attacking them, and got a bunch done, plus found a few new items to add to the list. I've made net progress of 10 items on the list.
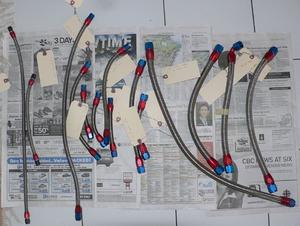
 Tuesday morning I removed all the flexible hoses that I had made up, so I could get them pressure tested. It took quite a while to get them all off, as some of them are difficult to get to. One of the inverted fuel system hoses had filled up with oil that had come back through the oil pump. That made quite a mess when I took it off. I made sure to label each hose as I took it off - otherwise it would have been a real jigsaw puzzle figuring out which one went where.
I dropped the hoses off at Kirouac Fluid Industries Tuesday afternoon, and picked them up yesterday. They all passed the pressure test. It cost me $60 to have all 14 hoses tested, but I figure it was worth the expense to be sure to find any problems now, rather than during the engine runs, or in flight. A leaking fuel hose could cause a fire.
Now I need to put the firesleeve on the hoses, and then reinstall them. The firesleeve needs to be clamped in place on each end. Type-certificated aircraft use nice stainless steel band clamps to do hold the firesleeve in place. Many homebuilt aircraft builders just use a few turns of safety wire, which probably works well enough, but really looks amateur. Someone on one of the e-mail lists was complaining about the cost of the stainless steel band clamps, and the tool needed to install them. Someone else suggested that automotive CV boot clamps were a suitable replacement. I spent several hours on Tuesday driving to various automotive parts places, looking at CV band clamp tools, and pricing out the clamps. I only found one place that had a tool, and it was $35. The clamps were going for $3 each, and I need 28 of them. I went on to Wick's web site, to see how much the expensive aviation ones cost - the clamps are $1.33 each, and the tool you need to install them is $7.20 for the cheap one, and $15.28 for the nice one. Time to put an order in to Wicks.
