Plenum Chamber - Slow Progress
- Details
- Written by Kevin Horton
- Hits: 5859
The last couple of weeks have been fairly busy, as I was on course for several days, which required some studying in the evening. And I had to take care of a few things on the Honey Do List.
In my spare time, I've knocked a few items off the To Do List, and added a few more, for a new change in length of the list of about zero. I've been flailing away on the interface between the cowling and the plenum chamber. I'm making progress, but each time I mentally tell myself that I have turned the corner, and all the hard work is done, I run into another snag. I've had to back up and change course several times, but I am slowing grinding closer to the end for the right side. I won't start the left side until the right side is nailed down, but I expect the second side should go much quicker than the first one.
I've already decided that I should have used a different type of fastener for the plenum chamber. At the moment it is held in place with about 40 #8 screws, which will take some time to remove and reinstall every time I want to inspect the engine. I should have used some sort of quarter turn fastener, but I won't make that mod now. That'll be a change I make after I get flying.
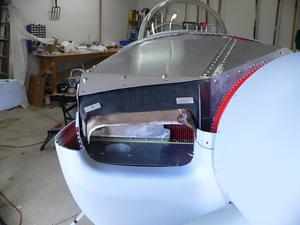 The basic concept is a strip of aluminum that will be riveted in the inside of the upper cowling inlet. A fibreglas transition piece will attach to that strip with three screws, and a long piece of inner tube rubber will go from there to the plenum chamber. This should provide a relatively good seal, while allow for motion between the plenum chamber (which is fastened to the engine) and the airframe. The sides of the rubber seal will be fastened to the vertical pieces of the plenum chamber sides, and the top will attach with four screws to the top of the plenum chamber. The edges of the inner tube will be sandwiched between pieces of aluminum sheet. The rubber inner tube pieces and fibreglas transition piece will remain in place when the plenum chamber top is removed.
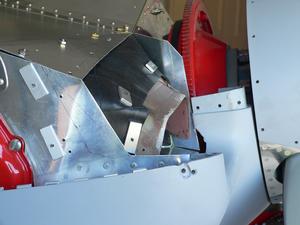 I'll be trimming the front part of the plenum side walls, as I only need enough material ahead of the aft edge of the rubber to provide structural support for the floor of the inlet.
On the Road - Found Aircraft
- Details
- Written by Kevin Horton
- Hits: 4955
I spent most of the week in Parry Sound at Expedition Aircraft (previously known as Found Aircraft) doing stall, take-off and landing performance flight testing on the Expedition 350. Found Aircraft was founded by the Found brothers shortly after WWII, and they produced the Found FBA-2C single engine bush aircraft in the early 1960s. The aircraft was very well designed for that role, but they lost control of the company, and the new owner blew all the money on an ill-conceived successor model, and company folded. Bud Found managed to resurrect the company in the 1990s, and relaunched production of the updated Found FBA-2C1 and -2C2.
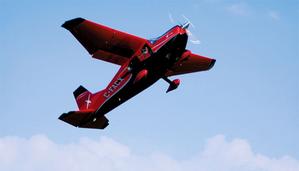 The company eventually realized that the bush aircraft market was fairly small, and that the tail wheel configuration would not sell well in the private owner market, so they decided to update the design with a tricycle landing gear, and changed the marketing name to Expedition Aircraft. They have a few rough edges to sort out in the cockpit, but I was quite impressed with the performance and handling, and the great utility of the aircraft.
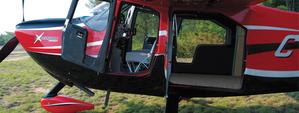 The aircraft has four doors that fold fully open. The floor is completely flat, and there is no raised door sill, which greatly facilitates loading cargo. The aft doors have a cutout to allow them to be opened with the flaps fully down (unlike another popular high wing utility aircraft), which greatly increases safety in float plane operations, by aiding egress following a take-off or landing accident. There are no wing struts to get in the way, another useful feature for float plane operations. The structure in the cockpit area is steel tube, which has a great record for occupant protection in a crash.
I've knocked a few small things off the To Do List, and added a few more - net change one item shorter. I've been working on the interface between the cowling and the plenum chamber, with slow progress but a lot of time wasted going down dead end roads. Yesterday I discovered that the dimensions I was using for the last phase of the interface wouldn't work, so I had to scrap several hours of work. That discovery bummed me out completely, so I downed tools and opened a bottle of wine. Today I redid about half the wasted work.
Misc Progress
- Details
- Written by Kevin Horton
- Hits: 4359
Many, many months ago I started working on some fibreglas pieces to transition from the cowling air inlets to the plenum chamber mounted on the engine. The fibreglas pieces will connect to some rubber, which will connect to the plenum chamber. Hopefully this will provide a relatively air-tight connection, while allowing for relative movement between the cowling and plenum. At the moment, I consider this concept a big experiment. I've had to modify the original idea a bit, but I haven't run into anything that suggests the concept won't work. I'll post full details and photos once I have finished the fabrication, and confirmed the concept works.
Another parts order arrived, so I was able to finish several other small To Do items. I found a few more items to add to the list, so the net progress this week was about two items, with the list now sitting at 23 items.
I put the front seat back in temporarily, as I need to sit in the cockpit to evaluate several possible mounting locations for the Dynon HS34 expansion module. Once I decide where to mount it, I may fabricate the wiring harnesses to facilitate a planned later purchase of an expansion module and a second D-10A EFIS. The second EFIS would go directly below the current EFIS, and would normally be used as an EHSI, replacing the CDI that is currently in that location. The HS34 is needed to allow the EFIS to display deviations from the Garmin GNS 430.
Canopy Lock
- Details
- Written by Kevin Horton
- Hits: 6887
A few days ago, I started the installation of a canopy lock.
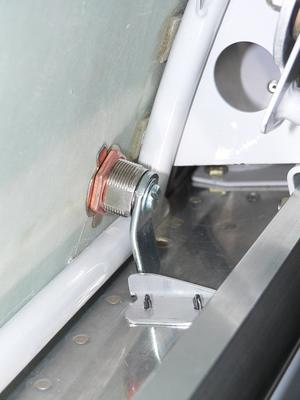 Yesterday I finished fabricating the canopy lock, and drilled and clecoed it in place. I bent the arm that attaches to the lock cylinder, to increase the clearance to the canopy frame, move the arm end inboard, and put it at 90 degrees to the canopy sill.
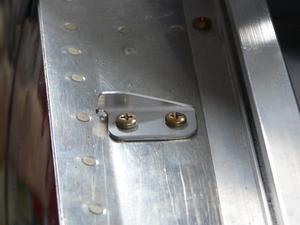 I wasn't sure at first whether I should rivet the lock striker plate in place, or use #8 screws. I let that question stew overnight, and decided to use the screws. That will allow me to remove it when the aircraft is painted, and it let me use the bottom end of a screw for an Adel clamp that secures the static line, which runs underneath the canopy sill. I needed to secure the lien in that area, to ensure that it couldn't chafe against the screws (or rivets) that attached the lock striker plate.
Canopy - cleaned, polished, mounted
- Details
- Written by Kevin Horton
- Hits: 7198
I was on vacation last week. I split my time between working on the RV-8, doing some computer programming, and just enjoying the fine summer weather. I added a few new items to the To Do List, but managed to complete enough items to get it down to about 25 items left.
I made new serial data cables for the engine monitor and Garmin GNS 430, as the similar cable for the Dynon EFIS had proved fragile. The new connectors were a royal pain in the you know what to solder the wires too, but the new cables should be much more durable, and easier to repair if needed.
I spent quite a bit of time polishing out scratches in the canopy. I used the Canopy Scratch Kit that Van's sells - it works quite well. I only needed to use that kit on selected areas. I used some 3M marine Plexiglas cleaner and polisher to clean up the rest of the canopy.
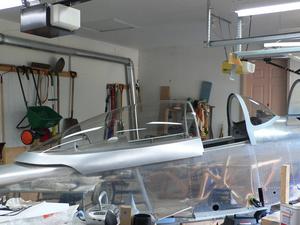 After the canopy was all clean and polished, Terry helped me get it back on the aircraft. A local RV builder reported that he managed to break the #8 screw that attached the canopy latch to the latch shaft. My canopy latch is fairly stiff to lock in place, so I was afraid that perhaps the same failure could happen to me. I removed the #8 screw, and drilled, tapped and countersunk the latch assembly to use a #10 screw, which is a lot stronger.
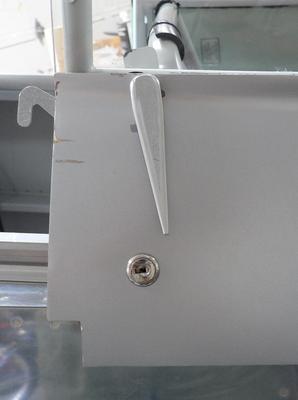 Yesterday I spent quite a bit of time pondering how to make a canopy lock using a spare key set, the same as the one for the forward baggage door lock. Obviously a canopy lock won't stop a serious thief, as he would just break the Plexiglas. But it should stop a casual thief from grabbing a headset, etc while the aircraft is at an airshow. I've got a bit more work to do to finish this off, then I'll post a description and pictures of the rest of the lock system.
EFIS Update with Virtual PC
- Details
- Written by Kevin Horton
- Hits: 4276
This was a bit of a crazy week, as I was in the simulator phase of my annual Cessna C550 Citation II recurrent training. I had a sim every day except Friday, and had a fair bit of studying to do. Plus I spent a bunch of time working on the on-line course for the big avionics upgrade that our Citations are undergoing. And, I had a few household repairs to make.
Today I attacked the problem of updating the firmware in my Dynon EFIS to the latest version - 3.0.0, which was released recently. The Dynon Product Support Program requires Microsoft Windows. All our computers are Apple Macs. In the past, I would install the Dynon Product Support Program on my work laptop. But, our IT folks have changed the setup on our work computers, and I no longer have the ability to install new software on it. Arrgh.
Yesterday I remembered that I had an old copy of Virtual PC hanging about somewhere, and I decided to see if it would suffice. But first, I had to make a new connection cable. The EFIS, engine monitor and GPS each have their serial connections wired to separate audio jacks. I made three cables with audio jacks that connected to 9 pin DB-9 connectors on a Keyspan 4 port USB-serial adapter, which connected to my computer. I went with the cheap and easy approach when I made those interconnect cables - I purchased three audio extension cables with an audio jacks on one end, cut audio plug off the other end and crimped the wires into the sockets on a DB-9 connector. But those wires weren't really compatible with the sockets on the DB-9 connector, and the cable for the EFIS finally failed. I purchased high quality audio jacks, which must be solder to the wires, which is what I should have done in the first place. Today I solder a connector to three AWG22 aircraft quality wires, and crimped sockets on the other end, which is what I should have done in the first place.
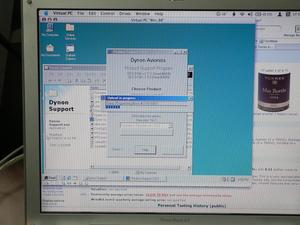 After making a new interconnect cable, I hooked up my 12" PowerBook computer, fired up Windows 98 on Virtual PC v5.0.4 build 2404. I was absolutely amazed to see that the Dynon Product Support Program, running on Windows 98, running under emulation on a PPC CPU, was able to find its required serial port, which was provided by OS X via a USB to serial adapter. The support program was able to connect to the EFIS, so I did a firmware backup. This took quite a long time, but it was successful.
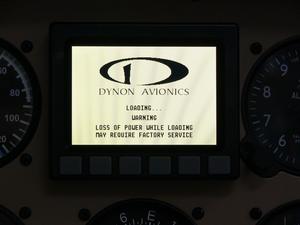 The EFIS displays a fairly frightening screen message during any downloads or uploads. I hooked a battery charger to the aircraft battery, and connected the laptop's power adapter to help ensure no power outages.
Then I updated the firmware to the latest v3.0.0, which also took a long time, and appeared to be successful. I was initially puzzled, as I did not see some of the expected changes in the EFIS display. But a quick review of the product Release Notes indicated that I had to use the EFIS menu -> SETUP -> STYLE -> MODERN selection to change to the new display format.
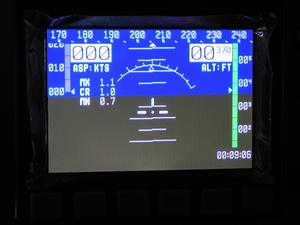 This is the previous display format, for comparison.
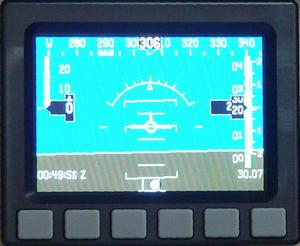 This is the new format. The colours haven't changed - the two pictures were taken with different cameras. Note that the digital values for the airspeed and altitude are now line up with the centre of the display, similar to the presentation on transport category aircraft EFIS systems. The aircraft symbol at the centre of the attitude display is more prominent. Many, many other changes, not seen here are described in the Release Notes
