Shimming the Axles
- Details
- Written by Kevin Horton
- Hits: 3633
I was on the road for a few days this week, so progress was slow. After getting the landing gear legs installed, I bolted on the axles, but then found that one is slightly toed in, and the other slightly toed out. I ordered two shims from Vans to sort that out. I also installed the tires on the wheels, got the wheel pants trimmed, drilled and clecoed together, and and a slot cut so they'll fit around the landing gear legs. I can't do the final fitting until I get those shims, and get the axles correctly aligned. I also started fitting the gear leg fairings.
Installing the landing gear legs
- Details
- Written by Kevin Horton
- Hits: 3872
I worked on installing the main landing gear legs over the last week. This was one of those jobs that would have been done in an hour if everything went right, but it took me a week of spare time. I got bit by a "small" design change that I had made to the landing gear boxes to solve a "problem" earlier last year. The "improvement" I made then I swapped a rivet and screw location in the landing gear boxes created an interference problem between a screw and the big bolts that attach the outboard end of the landing gear legs. It took me a few days to figure out what combination of fastener types and orientation would work fit yet still give the same strength.
 Today I turned the fuselage back upright and put it up on some stands so I could start fitting the axles, wheels, brakes and wheel pants.
Countersunk vs round screws in cockpit
- Details
- Written by Kevin Horton
- Hits: 4176
I decided to replace the round head screws on the rear seat throttle assembly with countersunk ones, and I'll do the same on the cockpit side covers beside the rear seat as soon as I get more countersunk anchor nuts. I may eventually replace most of the round head screws in the cockpit with countersunk ones, as they look much cleaner.
Removeable cockpit floors
- Details
- Written by Kevin Horton
- Hits: 4758
This weekend I finally bit the bullet and modified the cockpit floors to make them removable. The basic design uses pop rivets to fasten the cockpit floors, which means they are essentially non-removable. I wanted to be able to remove them to inspect the structure underneath,  so I finally modified the bottom of the F-805 and F-806 bulkheads so the floors can be removed. I enlarged all the mounting holes to take #8 screws, and started installing all the anchor nuts. All the visible areas will be fastened with countersunk screws, so the floors will be flat. The hidden areas will get round head screws. It is a lot of extra work, but it'll pay dividends a few years down the road.
More Canopy Skirt
- Details
- Written by Kevin Horton
- Hits: 4349
This week, I got all the holes drilled in the canopy skirt where it attaches to the canopy frame. I've got a bunch of fibreglas work to do on the skirt next, but I'm going to put that off a bit until it gets warmer,  and I have done the fibreglas work on the tail surface tips. They are a better place to learn about fibreglas because they are smaller, cheaper, and not as visible.
Riveting aft fuselage upper skin
- Details
- Written by Kevin Horton
- Hits: 4385
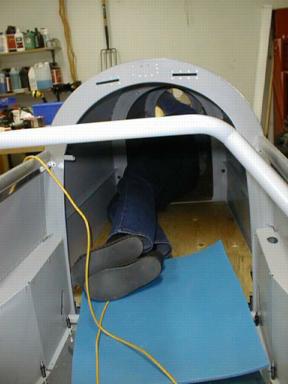
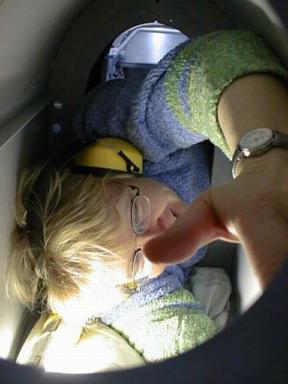
Terry and I finally finished riveting the aft fuselage upper skin today.
 These two shots were taken while Terry was bucking the rivets in the aft fuselage. The first shot is looking into the aft fuselage from the cockpit area.
 The second shot was taken though a hole in the F-810 bulkhead, which is where the aft fuselage upper skin ends at the rear of the fuselage. There isn't much room in there - better her than me :-)
