Landing Gear Box on the Bench
- Details
- Written by Kevin Horton
- Hits: 4474
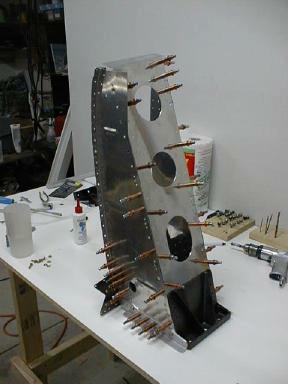
 Here is the complete right landing gear box all clecoed together.
Drilling Various Fuselage Items
- Details
- Written by Kevin Horton
- Hits: 4344
The instructions call for some of the items that attach to the fuselage skins to be drilled later, after the skins are riveted on, and the fuselage is turned upright. But, you have to dimple the holes before you rivet the skins on, because you won't be able to get a squeezer to the holes later. That means that when you finally drill the holes in those items, you are trying to drill through a dimpled hole. Apparently this will work with acceptable accuracy, but I wasn't crazy about the concept.
I elected to drill almost all those items now, with the fuselage in the jig. I drilled the F-860A, B & C armrests, the F-864 and F-865 consoles, and the F-866 forward baggage bulkhead. I didn't drill the F-803 instrument panel, as those holes are close enough to the top of the skin that I will be able to dimple them later.
Landing Gear Box Progress
- Details
- Written by Kevin Horton
- Hits: 4094
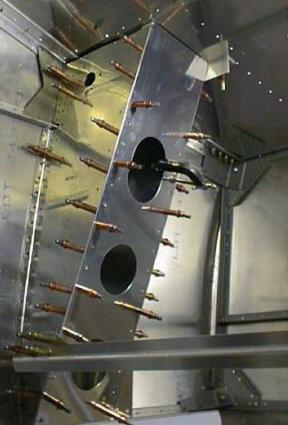
 Here we are a bit further along in the process. I have to fabricate and install the F-802H angles, which goes between the floor and the aft face of the landing gear box. Then I will remove the landing gear box assemblies from the fuselage, and finish drilling the holes from the F-802A and B into the Wd-822, and the ones from the F-802C into the F-802E. I drilled enough of those holes already to hold everything in the right position, and it will be a lot easier to do the rest of them on the work bench where I can reach everything without twisting myself into a pretzel.
Right Landing Gear Box
- Details
- Written by Kevin Horton
- Hits: 4097
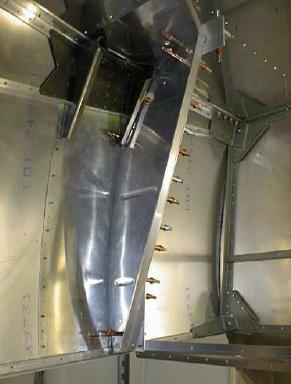
Here is the right landing gear box partially drilled and clecoed together. The fuselage is built upside down, and we are looking toward the front, with the firewall visible at the right of the picture.
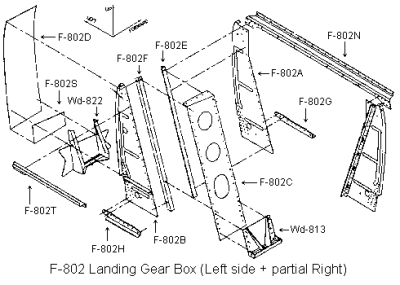
 You can see the F-802A, D, E, G and N (the F-802G is not trimmed to shape yet), and the Wd-822.
I had to fabricate a tapered shim to fill an 0.063 gap between the top of the Wd-822 and the F-802A. Apparently my F-820 Forward Side Skin (which determines where the F-802A will end up) is a bit too far forward compared to the F-822 bottom skin (which determines where the F-802G goes, which locates the lower end of the F-802A and the Wd-822).
Landing Gear Boxes
- Details
- Written by Kevin Horton
- Hits: 7407
The main landing gear legs on the RV-8 attach to the forward fuselage, unlike the other RV tail-dragger models, where they attach to the engine mount. On the RV-8, the Landing Gear Boxes are big, complex pieces of structure that take the structural loads from the landing gear legs and distribute them over most of the forward fuselage. 
Gotchas - Fuselage Skins
- Details
- Written by Kevin Horton
- Hits: 5981
Gotcha's
- Tabs on F-820 Forward Side Skins - You must be careful to get the tabs on the lower edge of the F-820 to match up exactly with the vertex of the F-843 Forward Lower Longeron. If not, you probably won't have the correct edge distance on the Wd-822 when you are working on the Landing Gear Boxes.
You must also be very particular to get the F-820 exactly in the correct position fore and aft. If you don't (as I didn't on the right side) this could cause the Wd-822 to not fit nicely against the F-802A when you are working on the Landing Gear Boxes. And, as I learned much later, the fore and aft error in the F-820 will propagate all the way aft to the tail and could contribute to a slight twist in the F-812 bulkhead, if you aren't paying attention there.
- F-826 & F-827 - The F-826 & F-827 are the bottom center skins. They cleco to the F-804 bulkhead at the front, and then just sit on top of the seat ribs until you drill and cleco them. So far so good (so I thought). After drilling and clecoing the F-826 & F-827, I grabbed the F-842 aft bottom skin, and slipped it under the F-826 & F-827. It has match holes that are supposed to match up with holes at the aft end of the F-826 & F-827. Well, I quickly discovered that I couldn't match up with both the F-826 & F-827 at the same time. It turns out that there is enough slop in the holes clecoed at the front of the F-826 & F-827 to let the aft ends move slightly. I ended up with the aft ends of the F-826 & 827 about 3/32 inch too close together, i.e. the holes that should match up with the F-842 were 3/32 too close together.
How do you prevent this from happening? Well, I would do two things differently if I could do it all over again. First, when drilling the F-822 (or F-890 for the -8A), I wouldn't drill out the holes that hold it to the F-804. Those are the holes that you cleco the F-826 & 827 to, so you will get a tighter fit if they are not drilled out yet. They are already big enough to take a cleco, and you have to drill them again when fitting the F-826 & 827 anyway, so there is no point in doing them when fitting the F-822.
Second, when drilling the F-826 & 827, I would consider clecoing them to the F-804, and then putting the F-842 in place, clecoing the match holes in it to the F-826 & 827. Then I would drill the center hole at the aft edge of the F-826 & F-827 to lock them together. That way you have a reference to make sure that the match holes on the aft edges of the F-826 & 827 are right distance apart when fitting the F-842.
Anyway, it wasn't a big disaster. I drilled a couple of extra holes to compensate for the figure 8 ones I've got now. It is on the bottom of the fuselage, and if I catch any of you folks crawling under there to take a look I might accidentally step on your hand to distract you :-)
- F-812 - I ended up with a slight twist in my F-812 bulkhead, with one side of it being slightly ahead of the other at the top. This twist had its seed in a slight fore and aft difference between the position of the two F-820 Forward Side Skins. As you drill additional skins, each skin has match holes that you cleco to the next forward skin. So, one of my F-824 Aft Side Skins was slightly ahead of the other one. When drilling the F-824 to the F-812 bulkhead, I simply put the centreline on the flanges in the centre of the holes in the skin. Wrong! I should have made sure the bulkhead was exactly at 90° to the centreline of the fuselage, and accepted that the holes would not be exactly in the centre of the flanges.
- F-822 - The plans show two anchor nuts in the middle of the F-822. They are not needed if you are putting in the optional ground adjustable rudder pedals (the ones that you need wrenches to adjust, not the basic design where you can move them in flight). You can just dimple those holes for AN426 rivets like all the other ones in that row. I didn't figure this out until I had already riveted the F-822. Now I have to get or make a tool to dimple holes in the middle of the sheet (Avery sells one). The good news is that I don't have to fix this glitch until much later in the fuselage assembly process, so I have some time to work with.
