Riveting right upper wing skins
- Details
- Written by Kevin Horton
- Hits: 3650
I couldn't put the wing skins on until I finished working on the fuel tank, because I needed to do the final drilling on the tank mounting screws, and countersink the holes. The wing skins would have gotten in the way of the countersink cage.
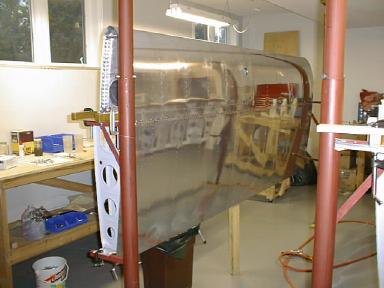 I finally closed the right fuel tank on 28 August 99, and got all the prep work done for the wing skins. On 6 September 99, Rob Erdos (hopeful RV-6 builder) helped my rivet about 95% of the upper wing skins on the right wing. Terry, my wife, bucked the last 30 rivets today.
It looks great to have wing skins that aren't festooned with clecos :-)
F-804 Buikhead - Wing Carry Through Structure
- Details
- Written by Kevin Horton
- Hits: 5805
Here is a view of the aft side of the F-804 bulkhead, which is the carry through structure for the main wing spar.
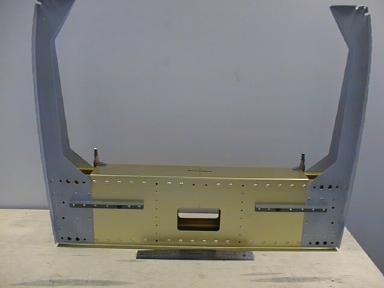 You can see the gold anodized finish that is on the wing spar and F-804 parts as delivered from Van's. The vertical pieces are primed with Marhyd self-etching primer, because it leaves a nice finish, and those parts will be visible in the cockpit, and they are alclad parts, which means they don't need a real heavy duty corrosion protection. The horizontal angles are primed with an epoxy primer, because they are not alclad (which means they need good corrosion protection), and they will be hidden under the floor boards.
The rectangular hole in the centre is for the tube that connects the front and aft control sticks.
The cockpit floor mounts on the pieces of horizontal angle riveted to the back face of the bulkhead.
The large holes at each side are for the big bolts that attach the wing spars.
Read on for more.
Riveted the Firewall
- Details
- Written by Kevin Horton
- Hits: 3252
I finally riveted the firewall together today.
The firewall is riveted together with flush rivets, with the rivets flush on the front side. The purpose is to leave a nice flat surface to mount things on when doing the engine installation.
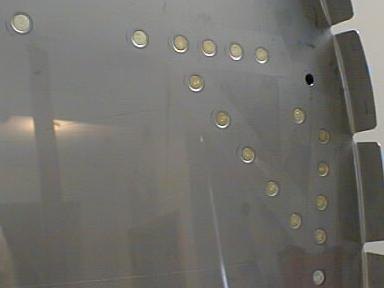 The hole at the top right side of the picture is one of the four holes that the engine mount bolts to. It will be drilled out later to the proper size.
Rear baffle riveted in right fuel tank
- Details
- Written by Kevin Horton
- Hits: 3766
I finally riveted the rear baffle in the right tank today. Hooray!!
Here you see the right tank sitting in the cradle that holds it while riveting. The pieces of wood are used to clamp the skin tightly against the flange on the rear baffle while the Proseal cures. The Saran Wrap keeps the Proseal from bonding to the wood (I hope). The bracket at the bottom right side of the picture will attach the leading edge of inboard rib to the fuselage.
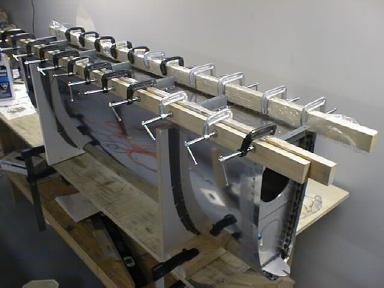 I realized after finishing the riveting that I hadn't filled a tooling hole in the rib on the outboard end. :-( I'll have to pop rivet a plate over that hole and cover the works with Proseal.
I've also got to put some Proseal over the rivet heads - I ran out of time to do that yesterday before the Proseal started to cure. At least I don't have to wait to do that - I can press on with the rest of the right wing.
The left tank needs to have the end ribs put in, and then it too can be closed up.
Gotcha - Firewall
- Details
- Written by Kevin Horton
- Hits: 5641
Gotcha's
Note - The following info is based on fuselage parts that were shipped in January 1999, and on the drawings as received. Some of this information may not be valid with later fuselage parts, later revisions to the drawings or amendments to the Construction Manual.
F-801 Firewall - The battery tray has two possible mounting locations. You will want to mount it on the firewall in most cases (see the discussion in the Construction Manual). If you mount it on the firewall, it uses four of the holes in the firewall angle pieces. You should leave those holes open, and you don't need to dimple the firewall, or countersink the angle at those locations. I didn't figure this out until I was ready to mount the battery tray, so I had to drill out four rivets. See DWG 31.
Seat Ribs Riveted
- Details
- Written by Kevin Horton
- Hits: 3151
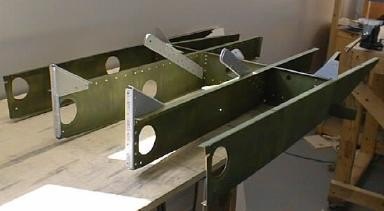
Here are the seat ribs after riveting them together.
I used gray Marhyd self-etching primer on the parts that will be visible from the cockpit, and I tried a marine zinc-chromate on the other stuff. I didn't get good adhesion from the zinc-chromate, so I probably won't use that on too much else.
 I don't have that much more work to do on the fuselage parts before I need to get a jig set up. Once I finish the firewall (F-801) and wing carry through (F-802) I need to get the garage ready for the fuselage jig.
