Cowling trimming
- Details
- Written by Kevin Horton
- Hits: 4218
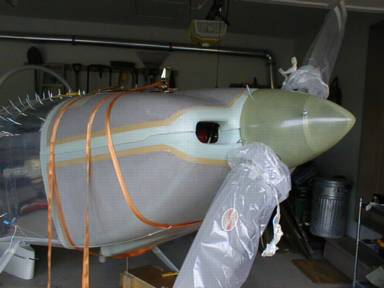
I worked hard to trim the cowl to get an inlet height of 2 3/4 inch. I got the height set, and I fitted the cowling a bit low at the front, as most builders report that the engine sags a bit after the aircraft flys a few hours and the rubber engine mount bushings take a set. I hope that engine sag happens fairly quickly, as I don't have much clearance between the top of the valve cover on the front left cylinder and the cowling.
This week I finished trimming the lower cowl at the firewall, then drilled the bottom and sides of the lower cowl to the hinges. Then I trimmed the edges at the horizontal line where the top and bottom cowl meet. Then I drilled the cowl to the two pieces of hinge that go at at that horizontal split. I also cut out the opening for the oil filler door.
EAA 486 RV Forum
- Details
- Written by Kevin Horton
- Hits: 3967
EAA 486 RV Fly-in - I drove down to the EAA 486 RV Fly-in on 7 Sept to check it out, as I had heard good things about it in the past. The weather was perfect and there were several dozen RVs to look at. I spent most of my time studying cowlings. But the highlight of the day was a ride in Scott Jordan's beautiful RV-8 - thanks Scott!
Cowling hinges
- Details
- Written by Kevin Horton
- Hits: 5069
This week I've been working on the piano hinges that are riveted to the sides and bottom of the fuselage at the firewall. I discovered that I had made a big foul-up when I drilled the fuselage skins to the firewall. I had simply marked a line on the centre of the firewall flange, just like I did on all the other bulkheads. The result was that the edge of the firewall flange stuck out past the forward edge of the fuselage skins. I thought this would all be covered up by the cowling, but I didn't realize that the cowling, which is thicker than the fuselage skins, simply butts up against the fuselage skins, so the firewall flange must be flush with the edge of the fuselage skins, or it will interfere with the cowling. The firewall can't be removed now, so I was stuck with a tricky and tedious task of filing down the stainless steel firewall flange. At first it seemed like an impossible task, but I finally made progress by using a good quality file, a cutting lubricant (Boelube) and heavy pressure on the file. Not a fun job.
After the firewall edges were trimmed, I dimpled the holes, dimpled the hinges, riveted them in place, then fabricated a means to retain the hinge pins in place.
Cooling Drag vs Inlet Height
- Details
- Written by Kevin Horton
- Hits: 8482
I spent a bunch of time studying cowlings on 7 Sep 02 at the EAA 486 RV Fly-in. I noted one thing that is worth thinking about if you want to reduce drag - there was quite a bit of variation in how high the air inlets were. Van used to specify the height of the air inlets as 2 5/8 to 2 3/4 inches - the plans were later amended to remove this dimension. I didn't have a ruler with me, but it was quite clear that many RVs have air inlets that are quite a bit larger than what used to be called for on the RV-8 plans. These RVs also had quite a large flat area extending above and/or below the spinner, which also supports my theory that their cowl halves weren't trimmed as much at the front as Van intended.
So what, you ask? Well, if the height of the cooling air inlets is increased, the amount of air that goes into the cowling increases. If we look at the aircraft as our frame of reference, all this air has to slow down to pretty close to zero speed. Or, looking at the earth as our frame of reference, all this air has to be accelerated from a stop to the speed of the RV. This acceleration requires a force to be exerted on the air by the aircraft, and this force is felt by the aircraft as drag.
I picked up my avionics!
- Details
- Written by Kevin Horton
- Hits: 3514
Instrument Panel - I ordered my avionics from Stark Avionics quite a while ago. Everything was ready to ship soon after I ordered, except that the Microair com was back ordered. John's supplier kept saying "one more week". Finally the supplier said "not until October or November", so I told John to ship everything else. I received the avionics shipment the last week of August. I was like a kid at Christmas unpacking everything. And of course I got an e-mail from John four days later saying the Microair com had arrived, way ahead of schedule :)
Cowling
- Details
- Written by Kevin Horton
- Hits: 5790
The RV series have a fibreglas engine cowling, split into top and bottom pieces. The plans show that long pieces of piano hinge are used to hold the cowl to the firewall, and at the split line between the two halves. The top cowl is removed by pulling the hinge pin that joins the two halves together, then reaching in through the oil filler door and pulling the pins that hold the top half to the firewall. The top piece is then removed, allowing easy access to the hinge pins that secure the bottom half. Many builders have had problems with eyes breaking off the piano hinge. Others have flown over 1000 hours without problems. Scott McDaniels, one of the builders in Van's prototype shop, says the key is to ensure the cowl will fit in place without having to force it into position - i.e. ensure there is no preload on the hinges. Some builders have decided not to use the hinges, due to the reports of problems. However, I want to be able to remove the cowling quickly, as that will promote frequent inspections, so I decided to try the hinges.
 Like all the other fibreglas parts, the cowl halves have extra material around the edges that must be trimmed to fit.
The process starts by fitting the piano hinges at the firewall. The piano hinges attach with the rivets that fasten the fuselage skins to the firewall, so those rivets haven't been installed yet. You have to remove the clecos that go in those holes, put the hinge in behind, and drill though the holes into the hinge, clecoing as you go. I had two problems:
- the holes in the fuselage skin and firewall didn't want to stay perfectly aligned once the clecos were removed, and
- the edge of the hinge material didn't want to stay tight against the face of the firewall, so the holes I was drilling had a tendency to get closer and closer to the edge of the hinge as I went along.
Tip - I stumbled upon a couple of ideas that helped me through these problems:
