Flight Test Event Marker?
- Details
- Written by Kevin Horton
- Hits: 3407
I've started to ponder adding an event marker that I could use to indicate areas of interest in the flight test data. I'm using a four-port USB to serial adapter to get the data into my laptop, and I'm only using three of the ports. So, I could possibly wire up the trigger on my stick grip to the fourth port. I would momentarily depress the trigger if there was an event I wanted to mark, and the time would be recorded on the laptop so I would know where to look in the data.
The problem is that at the moment I don't have a clear idea how this could work. Looking at summaries of the RS-232 spec, there are several lines that could legitimately be grounded for long periods, so I would expect that I won't damage the USB to serial adapter if I short them to ground with the stick-grip trigger. I'll probably do a quick experiment sometime this week to see if the Perl Device::SerialPort module that I have been using will cooperate to monitor a port that isn't actually sending a stream of serial data. There seem to be functions to watch for Data Set Ready or Clear to Send, so I might be able to use those.
Flight Test Data - Assistance from afar
- Details
- Written by Kevin Horton
- Hits: 2502
I had laboured away to write Perl scripts to record Engine Monitor and EFIS data. The scripts did what I needed, but I wasn't happy with the interface. And I realized that I needed to do some more work to make them handle the case where I started the script before I applied power to the avionics. And I still had to write the script for the GNS 430.
I had received an e-mail several months ago from someone who was interested in my data recording scripts. I sent him a copy, and heard no more. Then suddenly a few weeks ago Mike e-mailed me a EFIS data recording script that had a proper user interface, and was able to deal with the case where the script was started before the avionics were powered up. A week ago he sent me a script for the Engine Monitor, and now he is starting to work on one for the GNS 430. I have no idea who Mike is, where he lives, etc. But his work is very much appreciated. Thanks Mike!
Wing tip progress
- Details
- Written by Kevin Horton
- Hits: 4563
I was on the road for two days this week, but I managed to find time to bond in aluminum strips to support the nut plates that will attach the wing tips to the wing. And today I did the physical installation of the wing tip antennae. The electrical installation will happen after the wings are permanently attached and I run the coax from the fuselage.
Tomorrow I think I will put some filler at the wingtip leading edge, as they don't perfectly match the wing leading edge. I won't install the nut plates until the fibreglas work is done, as they nut plate screw holes are two small to take a cleco. That means that once I install the nut plates I will have to use the screws to attach the wing tips every time I put them on to check the fit. It is much quicker to use clecoes, so I'll delay the nut plate installation until I have a perfect fit.
Instrument Panel Labels Painted
- Details
- Written by Kevin Horton
- Hits: 5063
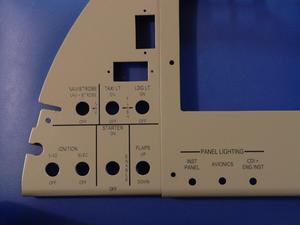 I picked up my instrument panel from the graphics shop last week. They did a very nice job, but there was a miscommunication on the colour of the text. I agonized over whether to have white or black text, and finally decided on white. I told them I wanted white, verbally and in writing. But they did black. I decided to accept it, as it was a very close decision on the colour, and although they were willing to redo it, it was likely going to be difficult to properly remove the black without messing up the instrument panel finish. I was concerned how the black lettering would show up with the instrument panel lighting, so I temporarily installed the panel to have a look - it was acceptable.
Other than the colour glitch, I am extremely happy with the job they did.
I took the coming week off, as I have a bunch of comp time to burn off. I'll be working on finishing off the odds and ends in the cockpit, so I can install the fixed portion of the instrument panel and rivet the forward skin.
Update - 17 Apr 2011 - Someone asked me which company I used for the silk screening. It took a bit of digging to find the answer, so I'll post their name here, to make it easier to find next time. The work was done by Mark-It.
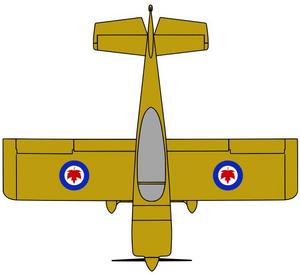
Paint Scheme Side and Top View
- Details
- Written by Kevin Horton
- Hits: 11499
I've spent a bit of time over the past week messing around trying to put the Golden Hawk colours on an RV-8 side view. I tried several different applications (GraphicConverter, Sodipodi and Inkscape), but eventually ended up using the Gimp. I've got no shortage of info to work with - a large collection of photos, a copy of the official RCAF paint scheme drawings for 1961, and an article from a plastic modelers magazine that shows how the Golden Hawks scheme evolved over the years. The hard part is jamming all that stuff into the computer and making it come out right. I'm certainly no artist.
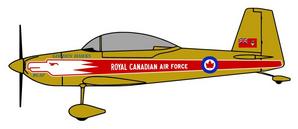 The gold colour in this side-view is not perfect, but you get the idea. I don't yet have the right font for the "GOLDEN HAWKS" and "RCAF" above and below the hawk's head either. And I haven't put in the black anti-glare area ahead of the windscreen. I'm not sure I like that aspect of their paint scheme, so I may deviate from history a bit there.
Astute observers will note that there are no registration marks. That obviously won't fly, but I haven't yet sorted out what size marks I can get away with. If I had a few years legal training I might be able to decipher CAR Standard 222 - Aircraft Marking and Registration Standards. Everytime I read it I come up with another twist on the way the various parts of it interact. I want to try to talk to the person in charge of those regulations this week to get the sordid details. My fall back position is to put large marks under the wings, and small marks on the vertical tail.
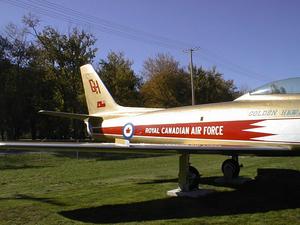
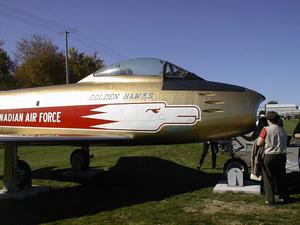 Here are two shots I took of a Sabre in Golden Hawks colours at the Royal Canadian Air Force Memorial Museum in Trenton, ON a while back. The markings evolved a bit over the history of the team. In particular, the GH seen on the vertical tail was not present in the early years of the team - it apparently appeared in late 1962. I haven't decided yet whether I will use it or not.
Wing Tip Mounting
- Details
- Written by Kevin Horton
- Hits: 4498
Saturday afternoon I finished the aileron trim installation, except I didn't hook up the springs to the controls. I'm going to leave it disconnected until after first flight, as it will be easier to sort out the lateral rigging if the trim isn't masking any rolling tendency.
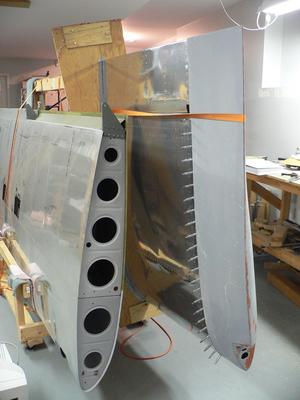 We are having a bit of a cold snap, and it took a long time for the garage to get warmed up yesterday. So today I decided to work in the basement, where the wings are stored. I attacked the left wing tip - it took quite a bit of trimming to get it to fit, and a lot of measuring to get the holes evenly spaced. It fits fairly well, except that the trailing edge of the wing tip sits about 3/16" higher than the aileron, and the wing tip extends aft a bit further than the aileron. I'm not going to mess with it now, as I want to wait until the wings are mounted and I have confirmed the aileron rigging is perfect. Then I'll split the wing tip trailing edge open and make it fit properly. I've got to fit all the platenuts to allow the wing tip to be removable, and I have to install the wing tip antennae.
