Fighting Friction in the Control Sticks
- Details
- Written by Kevin Horton
- Hits: 2718
Last night I got the sticks back in place, but I was troubled by too much friction in the roll axis once I tightened down all the bolts that hold the whole thing in place. This was something that I had noted quite awhile ago, and it was on my list of things to fix.
I took an adjustable wrench and slipped it over the bracket that holds the front end of the stick assembly. If I pulled up on it slightly, which moved the rod end forward, I noted that the friction disappeared, and the motion in roll became smooth as silk. So, that meant that the bracket needed to be a bit further forward. I made a shim out of the thinest aluminum I had, but the friction was still there, and now I needed to push down on the adjustable wrench to get rid of the friction, so I had obviously overshoot the mark.
I looked for some brass shim stock today, but I couldn't find a place to buy it in small quantities, and the local scrap yard didn't have any. Another builder suggested I try an aluminum discardable pie pan, so I headed down to the aviation aisle of the grocery store. I found a package of little pans, and it turns out that the aluminum is only 0.003 inch thick. Tonight I made a stack of shims, put three of them in, tightened down the bolts and bingo - smooth as silk in roll.
I've still got a bit of friction in the pitch axis to fight with. I had thought I had beat that one a few months ago, but it came back when I tightened down the bolt that secures the brass bushing that the rear stick pivots on. Hopefully I can sort this one out tomorrow.
Daily E-Mail Digest Recreated
- Details
- Written by Kevin Horton
- Hits: 2767
I just realized that after the big server crash I did not recreate the script that automatically sends out a nightly e-mail with the items posted on this site. I have set that feature up again, which means that there should be a big e-mail tonight with all the items posted since I got the site going again.
Audio Panel Harness & Wing Leveler
- Details
- Written by Kevin Horton
- Hits: 4666
I intended to install the audio panel wiring harness this week, but when I started the job I quickly realized that I had a problem. It seems that I neglected to tell the avionics shop what length wire I needed between the connector at the audio panel and the passenger's headset jacks, and they didn't ask. I told them I was building an RV-8, but they obviously assumed I was building an aircraft with side-by-side seating, because there is no where near enough wire to get the passenger headset jacks all the way to the rear seat. :(
I don't want to send it back to the avionics shop yet again, so that leaves me with two options - mod it myself, or pay a local avionics shop to do the job. At the moment I'm leaning towards doing the job myself, because that will also let me string the wire through the holes in the bulkheads before attaching the headset jacks. If the head set jacks are attached to the wires before I start I'll need 13/16" holes in each bulkhead to get them through. If I attach the jacks after running the wires through, I can get by with a much smaller hole.
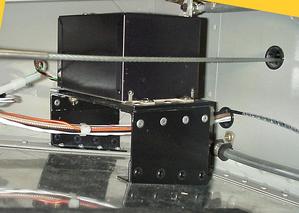
This weekend, while I was pondering the audio panel wiring harness questions, I attacked the mount for the Navaid wing leveler servo. I decided to mount it under the little shelf in the cockpit on the right side forward of the main spar. I got the idea from Ray Lynn. Randy Lervold also mounted his Navaid that way.
 Picture from Randy Lervold's web site - I plan to make one change from the way Ray Lynn and Randy Lervold attached their wing leveler servos. They both mounted the servo on a platform with a vertical wall on the inboard and outboard ends of the platform. However, when the servo is engaged, and it needs to move the stick, the forces on the servo will tend to move it inboard and outboard, which is the direction that this platform is more flexible.
I intend to have my two walls on the front and rear sides, which will brace the platform for inboard and outboard movements. The down side is that I will have to put a bend in each piece of angle that attaches the walls to the floor, as the floor is sloped. I figure I can give each piece of angle a squeeze in the vice to sort that out. I'll post a picture of my platform once I finish building it.
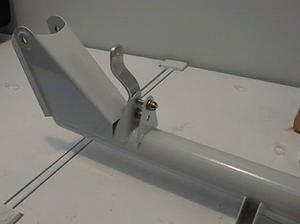
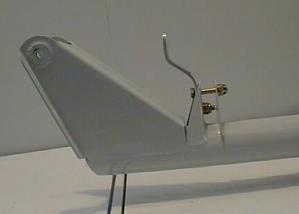
 I installed the control sticks in the fuselage several months ago, and expected that I would not have to take them out again. Well, today I realized that there was no way to drill the hole to bolt the arm that the wing leveler servo attaches to on the stick weldment unless I pulled the weldment out of the cockpit. It took me several hours to get it in the first time, so I wasn't happy about taking it out. In this picture you can see where I had to drill a hole through both vertical pieces of the weldment below the bolt that it pivots on.
 It took quite a bit of beating with a hammer to get the second bend in that piece of 0.125 aluminum, but the result turned out OK. You can see the nut that goes on the bolt that secures the aluminum arm to the steel weldment.
Avoid Aerosonic Altimeters!
- Details
- Written by Kevin Horton
- Hits: 4773
The following RV-List message has been reposted with the permission of the author:
--> RV-List message posted by: Bill Marvel
For those of you in the market for altimeters, you are probably going to choose between Aerosonic and United. I chose Aerosonic. A year later, I now have a United altimeter. You may be interested in why.
The short story -- Aerosonic altimeters have an internal mechanism to diminish needle vibration that United instruments don't have. This means that they also have more internal friction than does the United version. My initial pitot static check was fine, but a year later I had to troubleshoot a mode C problem. In the investigation process we did another pitot static check and the altimeter flunked the friction test-- by a lot. It was not yet two years old. What I learned from three instrument repair shops and one technician who does nothing but pitot static checks caused me to change over to the United altimeter and putthe other on the shelf. It is not uncommon for the newer Aerosonic altimeters to fail the friction test, sometimes every two years. This results in repeated repairs and overhauls. United altimeters don't have the same problem.
Read on for more.
RV-10 Update Posted at Vans
- Details
- Written by Kevin Horton
- Hits: 3538
 Another update on the progress on the RV-10 was posted on Van's website. They seem to be moving along fairly quickly, and it looks good for them to have the prototype at Oshkosh, in my opinion.
GPS found itself
- Details
- Written by Kevin Horton
- Hits: 3019
My avionics wiring harness finally arrived back from Stark Avionics mid-week. It was really cold here for most of the week, so I didn't want to try to heat up the garage. Instead, I took care of a few other odds and ends, and made a first pass through my 2003 taxes. It looks I owe money, so I won't rush finishing things off. That cheque will go in at the very last moment :)
I spent quite a while with an ohmmeter and wiring diagrams checking out the changes to the wiring harness. I had a fright for a few minutes when it looked like there still might be a problem, but I eventually it was simply a misinterpretation of the wiring diagrams on my part.
 It warmed up this weekend, so I worked at integrating the avionics harness into the rest of the wiring. Sunday I hooked a 12v power supply up where the battery would be, and powered up the busses. I had a 50 ft roll of coax that I had crimped a connect on each end (stupid move, as it means I need a big hole to string the coax through, unless I cut one of those connectors off), so I connected the GPS antenna to the GPS. I turned the GPS on, and lo and behold it actually started finding satellites. Not many satellites, though, as the signals were coming through the roof, the insulation and the ceiling in the garage, and a 50 ft piece of coax. But it found enough satellites to figure out it was near Ottawa.
I also mounted the altitude encoder, and plugged it into the transponder. It seemed to take forever for it to warm up and start putting out altitude data, but it finally came to life. And I also got the power and ground wires run for the Microair 760 com, the little round guy in the picture.
