Fibreglas Frustrations
- Details
- Written by Kevin Horton
- Hits: 4249
I've been fighting with fibreglas this week, and I'm about had my fill of this stuff. The wing tips are looking pretty good - I've just got a few tiny areas that need attention, at least until I shoot a coat of primer on, which will probably highlight a million pin holes.
 I attacked the empennage fairing again, after a year or more of procrastination. I had pretty poor fit at the leading edge of the vertical stab - the fairing was hitting against the leading edge of the horizontal stabilizer but it was still at least 3/8 inch away from the VS leading edge. So, I cut off the part of the fairing that hit the HS leading edge, so it would slide aft and fit against the VS leading edge. This week I put some electrical tape and wax paper on the aft fuselage and HS leading edges, clecoed the fairing in place, and laid up some fibreglas around the HS leading edges.
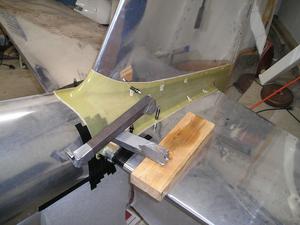
In this picture you see that I was using a couple of bucking bars to put some weight on the front corner of the empennage fairing, as it didn't want to sit down quite right. The new fibreglas I added wraps around the HS leading edge, so it holds the front of the fairing nicely in place.
 I noted that the fairing was sitting just clear of the aft fuselage, instead of sitting down nice and tight against it. I put some wax paper on the aft fuselage, then mixed up some West Systems fibreglas with microfibres, spread the mix on the underside of the fairing leading edge, then clecoed it in place. A bit of sanding to round off the edge of the fibreglas, and now it looks great. I also noted that it was lifting up a tiny bit between two clecoes on top of one side of the HS. An RV-3 builder reported good success using a heat gun to soften fibreglas to allow it to be reshaped, so I tried that - it worked great. Hopefully it is a permanent fix, and the part won't eventually regain its original shape.
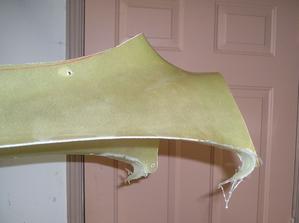
The canopy skirt is really giving me a hard time. I redrilled the holes on the aft end, and I thought it was fitting well, but now I find that there are gaps big enough to slip my fingers under. This is more than just a cosmetic problem, as any gaps will allow cold air to come in in the winter. Bad news. I tried using a heat gun to reshape it a bit, but the skirt seems to be made of some different type of fibreglas than the empennage fairing. It is green in colour, like the S-glass in the cowling. All the heat gun did was cause it to start to delaminate a bit, which isn't good.
The canopy skirt is a problem area because every aircraft is unique, so the part fits different on each plane. The top of the skirt attaches to the welded canopy frame, and each frame has a slightly different shape. And the canopy bubble attaches there two, and the canopy bubble is free-blown, so they are all slightly different. Add in variations in how each builder fits the frame to the fuselage, and you can understand why this is a common problem area.
I've pretty much decided that the only way I will get a good fit is to start from zero and make my own aft end of the skirt. I'll work on that this week.
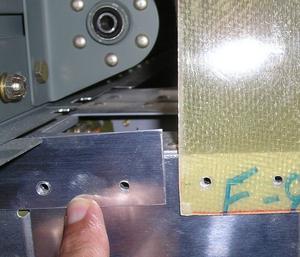
 Update - 18 Aug 03 - This picture shows the gap between the aft end of the metal lower empennage fairing and the front edge of the flat portion of the upper empennage fairing. This issue is discussed in the comment below.
RV-10 Specs and Perf on Van's Web Page
- Details
- Written by Kevin Horton
- Hits: 3611
Van has added RV-10 Specifications and Performance to the company web page.
Van reports:
Sufficient power and an excellent wing give the RV-10 very good performance. Tests of N410RV, our RV-10 prototype, revealed some impressive numbers.
Flown at 2200 lbs, representing a typical two-people-and-three-quarters-fuel weight, it achieved a take-off distance of 360’ and a landing distance of 525’. The climb rate averaged about 1700 fpm. At 75% power and 8000’, true airspeed topped the magic 200 mph mark...actually, it was 201 smph.
Seat cushions arrived
- Details
- Written by Kevin Horton
- Hits: 3661
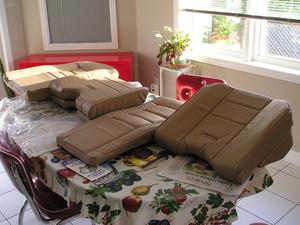
My seat cushions arrived today from Cleaveland Tool (seat cushion info is only on their old web site for now). I ordered them at Oshkosh last year, but asked them not to make them until this year, as I wanted to defer the expenditure. They look absolutely beautiful - I can't find a flaw anywhere.
 I came close to putting the floor boards back in so I could install the seat backs and try out the cushions this evening. But I eventually calmed down and realized that it would just be a make work project, as I have some stuff I need to do under the floor, so the floor boards would have to come out again. Maybe this weekend I'll secure the wires under there, and put the floor back in.
Wing tip lights - sand and fill
- Details
- Written by Kevin Horton
- Hits: 3487
Last week I placed two layers of fibreglas cloth inside the wingtips to reinforce the joint between the tips and the insert for the covered lights. This weekend I started working on the filler to smooth out the transition between the wing tip light assemblies and the tips. I'm on the second cycle of fill and sand, with another cycle or two to go. I wear a Tyvek suit, gloves and a respirator when I sand, as the dust isn't good to breath, and too much skin exposure will apparently promote an allergic reaction. That whole get-up gets pretty hot, so I arrange my schedule to do the sanding in the mornings.
Canopy skirt, again
- Details
- Written by Kevin Horton
- Hits: 3127
Not only did the canopy skirt fit poorly, but I later discovered that it extended too far aft, such that it would hit the empennage fairing when it was slid fully open. So, this week I made some measurements to see how far aft of the canopy frame the skirt could extend without hitting the empennage fairing when the canopy was fully open. I also looked at the case of removing the canopy by sliding it aft until the sliding block in the centre rear slipped off the rear track. In this case I assumed that I would remove the empennage fairing to allow more room - the leading edge of the vertical stabilizer then becomes the place the skirt will hit first.
This weekend I redrilled the holes in the aft part of the canopy skirt, where it mounted to the canopy frame. I've still got some trimming to do at the rear where it fits around the canopy track, but the fit along the aft portion is much, much better than it was before. I now think there is some hope to get an acceptable fit. I'll finish the trimming, then figure out how I am going to splice the two halves of the skirt back together - I had to cut it in two at the rear in order to get a decent fit. Van originally shipped the canopy skirt in one piece. But so many builders couldn't get it to fit correctly without having to split it into two pieces that he started shipping them that way.
Don\'t Turn Back
- Details
- Written by Kevin Horton
- Hits: 2889
There has been a long discussion on the RV-List lately about under which circumstances it would be possible to turn back to the runway after suffering an engine failure on take-off. Doug Rozendaal offered the following thoughts which deserve a wider audience.
--> RV-List message posted by: "Doug Rozendaal"
All,
Almost annually we have this discussion after an accident like this. I am alive today because I was, barely, able to overcome the urge to turn back after an engine failure. Several years ago I posted that story on a web page and here it is.
http://www.petroblend.com/dougr/dnt-turn.htm
Anyone who takes a BFR with me they will have an engine failure after take off at a altitude high enough to make them think they might be able turn back. If they try, it will be a looooong afternoon.
Please read this story! Please argue with me all you want, and PLEASE, when the fire goes out, lower the nose and land somewhere ahead of the wing.
As the defender of Don't Turn Back, I remain.....
Tailwinds,
Doug Rozendaal
P.S. For those who wish to say they can do it, that is not my arguement. I know it can be done, in some airplanes, at some airports in some conditions, but every year someone gets killed trying it.
