Electrical System Odds and Ends
- Details
- Written by Kevin Horton
- Hits: 3163
I was on the road at a Flight Test Workshop last week. It was basically a classroom refresher course on various flight test subjects that we decided to run in-house.
I'm slowly pecking away at the remaining electrical system work. I ran the wires for the pitot heat, leaving a coil of wire where it exits the fuselage. Originally I planned to have some sort of connector for the pitot heat wire at the wing root, but practically speaking the wings will probably never be removed once the aircraft is completed, so there didn't seem to be a lot of sense to adding this connector. It would just create several more connections in a high current wire, and could lead to problems down the road. I'll leave a few extra inches of wire at the wing root, so I can cut the wires and use butt splices if I ever have to remove the wings.
I hadn't made up many of the wire bundles yet - I was just laying all the wires next to each other along the planned routing. Now I am starting to bundle and secure the wires in areas that I believe I have no more wires to run.
I've just got one more switch to wire on the Right Subpanel, and it will be done - Turn Coordinator. But I'm still waiting for several orders of odds and ends to arrive first, as I am running out of FastOn tabs. Hopefully they will arrive on Monday.
I've been slowly working on the flight test plan and the Pilot's Operating Handbook in my spare time.
Dynon EFIS Installation Kits
- Details
- Written by Kevin Horton
- Hits: 3449
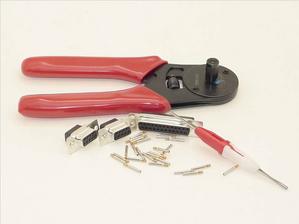 I was ordering some electrical stuff from B&C Specialties tonight, and I stumbled across a Dynon EFIS installation kit that they are selling. It consists of 3 connector housings, D-sub pins and a D-sub crimp tool. Note that the connector shells are not included. The kit can be ordered on their secure order site - it is near the bottom of the Wire Misc page.
As soon as I finished the electrical system order, I got an e-mail announcing that SteinAir was now selling Dynon EFIS installation kits too. You can find the link on their main page. It seems to be more complete than B&C Specialties' kit, and is cheaper too.
Dynon EFIS EMI
- Details
- Written by Kevin Horton
- Hits: 3958
It seems that Dynon is fighting an electro-magnetic interference problem (EMI). Hopefully it won't be too hard for them to solve. The following message was posted on the RV-List (the first part is a question from a list-member - the second part is a response from Sam Buchanan):
>>I recently flew my RV7 from Fl to Spokane and back and still >>love my Dynon D-10. I do however have a problem that concerns >>me: the D-10 emits enough RFI to render the VOR/LOC receiver >>inoperative unless within approx 7 miles of the station. The >>VOR voice is nothing but static. Turning the D-10 off >>rectifies the problem and the VOR will receive up to 100 NM >>away. I have a wingtip mounted VOR antenna.>>>>Dynon said they have had several complaints on this problem >>and are working on it. I was wondering if anyone on the list >>has had a similar problem and fixed it and if so how.
Yes, I have been dealing with the EMI issue with the Dynon. Like you, I am very impressed with the D-10, but the initial install was a bit challenging. One problem had to do with a bad magnetometer and has been successfully resolved. The other issue which is still present but now very manageable, is the EMI emitted primarily via the EDC remote magnetometer serial connection. I doubt that antenna location, radio stack location and other such physical items are going to have much impact on whether or not EMI is present in a particular Dynon installation.
It appears the EDC is transmitting considerable RFI back up to the D-10 via the EDC power feed. The noise then is passed along by the D-10 out the main power and keep-alive feeds to the avionics bus. EMI is a very strange and unpredictable animal that often flaunts logic. In my case, the noise was very noticeable through the com radio, even to the point of often breaking the squelch. But, it wasn't consistent; even though always present, it varied depending on the frequency in use, the time zone I was in, and what I had eaten earlier in the day. In other words, there was little pattern to the madness. The nav side of the radio was completely unaffected.
After some basic troubleshooting (disconnecting the EDC while the D-10 was running) it was determined that the EDC was indeed the culprit. Doug at Dynon was working through the problem and suggested I power the EDC via a different point on the avionics bus. That I did, and the noise was drastically reduced. As a part of Dynon's troubleshooting, I also installed some capacitors in the D-10 and the EDC and that lowered the noise level a bit more.
Bottom line, at this point in time there is still a very low amplitude noise in the my com radio which is only noticeable when receiving very weak signals. The separate power feed for the EDC "solved" most of the EMI problem. But the Dynon guys realize this is not a true solution since now the remote mag is isolated from the back-up power features of the D-10, and the EMI is still being generated. Also, the separate power feed can create some weird issues when using the support program to customize the EFIS. It is necessary to interrupt the power to the EDC when the D-10 is rebooted or the support program can hang since the EDC is still in a "Loader" mode.
I suspect there are many Dynon installations that have the noise issue but the builder doesn't know because the source of the noise is buried in the chaos of getting a new panel up and running and the builder is chasing all sorts of shielding ideas trying to figure out where the static is coming from. By the way, one of the first steps I took was to replace the CAT-5 cable I was using for the remote mag with four-conductor shielded cable, but that had no impact on the problem. I also shielded the main EFIS power cable but that likewise had no impact.
So shielding does not seem to be the answer, and the EMI bug will affect some installations and not others until Dynon gets a handle on the problem. If nothing else, the remote mag can be disconnected and the "problem" goes away (along with a *very* accurate heading indicator if the mag installation is carefully done!).
In my opinion, this in no way should be a discouragement to buying a Dyon EFIS. The unit works as advertised, and I am very confident the Dynon crew will squash this bug and do what is right to rectify the situation for those who find it necessary.
John, try the separate power feed for the EDC and your nav will probably again be usable.
Sam Buchanan
Small Steps
- Details
- Written by Kevin Horton
- Hits: 3566
I had high hopes of getting most of the fibreglas work done last summer, but I didn't get as far as I would have liked. I absolutely hate working on the stuff, so I didn't put as much time in on it as I should have. I finally officially declared fibreglas season closed, and started back at all the other aspects of the project.
I had previously done part of the electric pitch trim wiring, so I decided it was time to close it off. I ran all the rest of the wires, except the ones that go from the cockpit to the cockpit to the elevator. I hooked the servo up with some jumper cables, and did a functional test. It didn't work at first, and it took a bit of messing around with a multimeter to find a wire that I hadn't connect. Much to my relief everything then worked perfectly - front seat trim switch, back seat trim switch, trim disconnect switch on the stick, and trim power/rear seat trim disable. It all worked. No smoke.
I ordered a trim cable to go to the back of the aircraft this afternoon, plus I ordered a roll trim relay deck. I'll finish up all the electric trim wiring after I get that stuff.
I spent three hours this afternoon poring through catalogs and putting in on-line orders for a whole bunch of miscellaneous items. It's one thing to have a mental picture of what you want - it's a whole other thing to find the right part number to order.
Tonight I ran the wires for the Hobbs meter. It's power runs through a Datcon 100451 oil-pressure switch. The same switch will also control an oil pressure light - if the oil pressure is less than 15 psi the low oil pressure light will illuminate, and the Hobbs meter will not be running. If the oil pressure is more than 15 psi the oil pressure light will be out, and the Hobbs meter will run. I wanted the oil pressure light to back up the pressure transducer that feeds the EIS 4000 Engine Information System. If the oil pressure on the EIS 4000 and the oil pressure light are telling different stories I'll treat it as an indication problem - i.e. continue to planned destination. If the oil pressure light and the indicated oil pressure both say the oil pressure is low, then I'll treat it as a real problem and land as soon as possible.
Trio Avionics - New Kid on the Autopilot Block
- Details
- Written by Kevin Horton
- Hits: 4105
I just learned about the EZ Pilot, a new single-axis autopilot from Trio Avionics. It is a wing-leveler system that connects to a panel-mount GPS. It can intercept and track a GPS flight plan or fly on a selected course. The control head is compatible with the servo from Navaid Devices, so Navaid users wanting to upgrade can save some money by not purchasing the Trio Avionics servo.
Sam Buchanan posted the following info on the RV-List:
From the very early planning stages of the panel in my then VFR RV-6, Iconsidered the wing-leveler to be not only a convenience, but, as Dougstated, the way out of an unexpected bad situation. The Navaid hasfaithfully served my needs for over 500 hrs, and I have learned most ofits little quirks.
But.....there is a new kid on the block. Even though the DigiTrak guyshave gotten a lot of deserved attention with their new systems, and I ama very satisfied AlTrak user, Trio Avionics has introduced an auto pilotfor us Navaid pilots who want to join the 21st century. I have nowcompleted a handful of hours flying the new EZ-Pilot:
My trusty Navaid has been permanently benched! The EZ-Pilot uses theNavaid servo, and for Navaid users is shipped with an adapter cable thatmakes it plug-n-play. You can purchase just the control head if afunctional Navaid servo is already installed.
The feature set of the EZ-Pilot is far beyond what the Navaid can offer.I am amazed at how I can fly 180 degrees away from a waypoint, hit theservo switch on the EZ-Pilot, and watch the thing fly my RV-6 into aperfect teardrop intersection with the direct course to the waypoint.Having nav info displayed on the control head also brings real utilityto flying heading vectors as well. The roll control is via a solid stategyro so there are no little motors spinning in the control head. The yawresponse is quicker and more precise than the Navaid which results in abetter ride in turbulence.
I realize some of these features are available with the DigiTrak, butthe cool thing about the EZ-Pilot is the way it can serve as animpressive upgrade for us Navaid customers. The only problem I havefound with the EZ-Pilot is the VFD display. The unit was designed byguys who fly those planes with the wings on the wrong end of the fuse,and their panels are somewhat shrouded from direct sunlight. The VFDdisplay is cool for those guys but gets blown out in the direct sunlightthat we can get on our exposed RV panels. As long as the sun is notshining directly on the display, it really looks nice. But I have toshade the unit with my hand to read it when the sun is at my back.
Having said that, I have NO intention of putting the Navaid back in theplane! The preciseness and features of the EZ-Pilot are just that muchmore advanced than what I had been flying. Jerry Hansen, one of the trioat Trio Avionics has been very receptive to my input during beta testingand is aware of the display issue. I think you will find him a good guyto work with if you decide to pursue his system.
These are exciting times for experimental aviation! The new toys justkeep coming. Flying around with the Dyon doing its thing, the AlTrakholding altitude within 10-20 feet, and the EZ-Pilot holding coursewithin 0.01 mile, and me just sitting there watching over everything andfor traffic.......its hard for me to believe this affordable yetsophisticated capability is in a plane that was hatched in my backyard.
Sam Buchanan
I'll stick with my Navaid wing-leveler for now, but the AlTrak altitude hold pitch-axis autopilot may be part of the mid-life update.
Seat Belt Mounts
- Details
- Written by Kevin Horton
- Hits: 3671
I was messing around with the rear seat riser and seat cushions, and decided I should see how the seat belts interfaced with all this. I ordered seat belts from Hooker Harness, with Schroth rotary buckles.
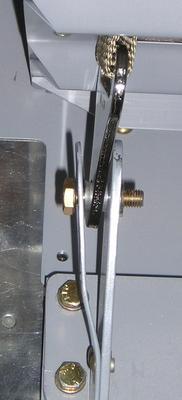 I went to install the front seat lap belts, and noted that there was a very wide bushing for the bolt that attaches the lap belt to the aircraft structure. This bushing required a much wider slot than is provided by Van's design for the belt attachment. You can see how the too long bushing is forcing the two parts of the mount apart.
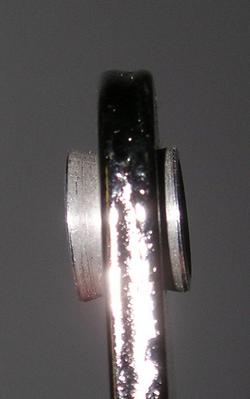 I pondered simply removing the bushing, but I wasn't sure why it was there, so I didn't want to risk affecting the integrity of the belt attachment. I called Hooker Harness, and explained the situation. They were very aware of the "issue", and recommended using a file to make the bushing narrower. They explained that the bushing was very important, as it ensured that the belt attachment hardware would be free to rotate around the bolt. If the hardware could not rotate around the bolt the loads would be carried by one edge of the belt webbing causing it to be cut and fail if a large load was placed on it.
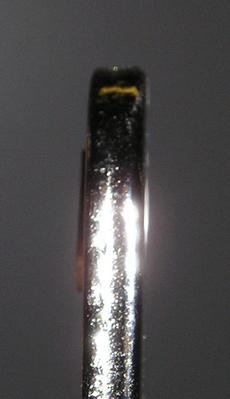 The bushing looks to have been made from a piece of aluminum tubing, with the ends expanded to keep it from falling out of the hole. I figured out that it was easy to take away material using a ScotchBrite wheel, with a piece of wood holding the other end of the bushing parallel to the seat belt hardware. I removed enough material to make the bushing about 0.020" longer than the attachment hardware.
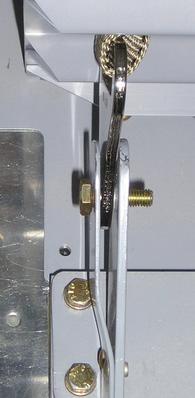 Now the seat belt hardware fits nicely as Van intended it too.
