Replacement Cylinder Installed - Lots of Work Left
- Details
- Written by Kevin Horton
- Hits: 2991
I was in Toulouse, France for the last week, on a course. It was good to be back in France again, but it meant no progress was made on the aircraft.
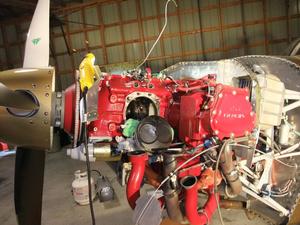 I took today off, and met with Andrew B. at the hangar this morning. He has removed and installed numerous cylinders before, and had offered to help me replace mine. It took us three hours, but we got the old one off and the new one on before lunch. Thanks Andrew!
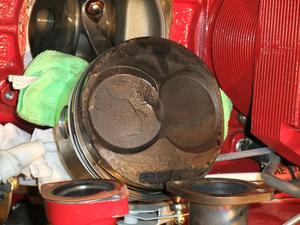 I was surprised to see how much deposits had built up on top of the piston in only 95 hours, but Andrew said that it looked very clean compared to other pistons he has seen.
There was also a hint of scuffing on the piston skirt. Andrew recommends I keep the rpm below 1000 rpm for the first minute or two after start, as the aluminum piston heats more quickly than the steel cylinders. Combine that with the higher thermal expansion of aluminum, and you have a recipe for scuffing. Lower rpm for the first few minutes should put less heat into the pistons, and give the cylinders some time to warm up.
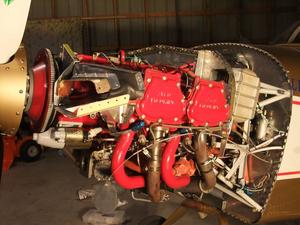 This afternoon I got a good way through reinstalling all the stuff I had removed to provide access to the cylinder. I got through the worst part of that, but still have several more hours to work to do before I can run the engine for a leak check. I'll do a very short leak check then do a two hour break-in flight. Maybe this weekend.
Replacement Cylinder Arrived
- Details
- Written by Kevin Horton
- Hits: 2965
Terry tells me that the replacement cylinder arrived on Saturday, but I was already on my way to France for a course. I'll get back home on Sunday the 28th and will hopefully get the cylinder on in the week after that.
GPS Coax Repair
- Details
- Written by Kevin Horton
- Hits: 3462
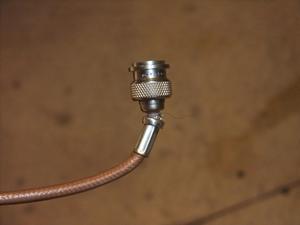 I got out to the hangar for a couple of times during the week, and for a few hours Saturday morning. I repaired the damaged coax connector at the GPS antenna. The antenna is mounted behind the rear seat, at the top of the rear baggage area. I must have damaged it when I had the aircraft stuffed full of camping gear for Oshkosh. The connector was so badly damaged that I am amazed the GPS was still working.
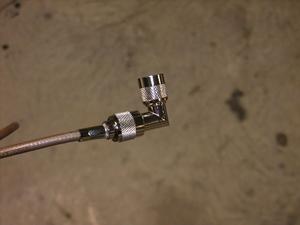 Originally I had a straight connector on the end, so the coax extended down a fair ways below the top of the baggage compartment. I looked for a 90 degree connector, but couldn't find one locally. I did find a 90 degree adapter, so I put another straight connector on, and used the adapter. This keeps the coax up against the top of the baggage compartment. I had a concept to add a metal shield around the bottom of the antenna to protect the coax from getting damaged. But, when replacing the connector I saw that the rear shoulder straps run very close to the antenna, and one of them would have been rubbing on my planned shield. So, I need to work on Plan B - perhaps some sort of plastic shield, if I can find something suitable to make it from.
After repairing the GPS coax, I pulled the Mooney at the front of the hangar outside, then I pulled the RV-8 out too. I fired up the GNS 430W and confirmed that the GPS was working, and that the autopilot was receiving data from the GPS. I had wanted to do this for awhile, but every time I was out to the hangar since I connected the GPS to the autopilot it had been raining.
I checked the audio panel connector, and found I would need to solder the autopilot disconnect aural warning wires to the pins if I wanted to add any more inputs. I was hoping that the connector used pins that are crimped to the wires. The access to the connector is poor - I should have left a longer pigtail on it. I don't trust my soldering skills enough to try doing that job, so I'll live without the aural autopilot disconnect warning.
I also hooked up the pitot input to the autopilot and did a leak check. Of course I had a small leak, and it took some messing around to find it and fix it. I still have to hook up the static system input. I had hoped to do that yesterday, but I ran out of time.
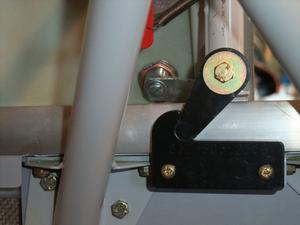 Up til now, I have been using a piece of cord tied to the front of the canopy with a loop that I would hook over the latch nub on the canopy bow. That would hold the canopy about halfway open, but it looked very agricultural. I saw a neat stop for the canopy at Oshkosh, and bought one from Fly Boy Accessories (product page). Vince at Fly Boy Accessories is a F1 Rocket builder, and he provides excellent customer service. The latch seems to work very well. If you open or close the canopy all the way this stop is bypassed. But, if the canopy is more than half open, and you slide it forward until it is just past midway, you can then let is slide back and the stop will catch it. If you slide it forward a few inches, then you can let it go aft and the stop won't be in the way.
Cylinder Update - Waiting
- Details
- Written by Kevin Horton
- Hits: 3160
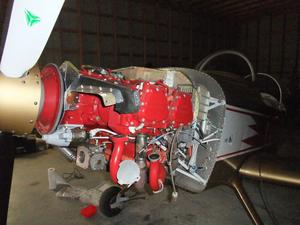 I got out to the hangar one evening this week, and attacked the stuff around #2 cylinder, getting it all out of the way. I removed the baffling, exhaust pipe, intake manifold, preheater, CHT probe, spark plug wires, air filter, etc. I wanted to get it ready so I could remove the bad cylinder as soon as the new one arrives. It all went pretty smoothly except for the intercylinder baffle between the two cylinders at the bottom. That guy was a real pain to get off, and I expect it will be even more difficult to get it back in place.
Yesterday morning I drained the oil from the engine, and replaced it with mineral oil for the cylinder break-in. The new cylinder was supposed to ship on Friday, and should probably arrive sometime this week. But, I'll be on the road for most of the next two weeks. My first chance to replace the cylinder will be on the week of the 29th. After replacing the cylinder it'll take me a few hours work to reinstall all the stuff I had to remove. If my schedule and the weather cooperate, I hope to get a test flight on the first weekend in December.
Navaid Servo Wiring to Trio Pro Pilot Autopilot
- Details
- Written by Kevin Horton
- Hits: 5297
The Trio Pro Pilot autopilot is compatible with the roll servo from the Navaid Devices wing leveler. But, Trio does not provide any instructions on how to do the wiring. The Trio servo is a development of the Navaid servo, but the Trio servo has some digital brains in it, and the Navaid servo is completely analog. The Trio servo has one more wire going to it than the Navaid servo does. The wire colours on the two servos are similar - red, green and black for the Navaid servo, and red, green, black and white for the Trio servo.
I sent an e-mail to Trio asking for info on how the Navaid servo connected to the Pro Pilot control head. One of the company owners responded, and I wired it as he told me. But, it didn't work. The servo would engage, but it wouldn't drive to neutral nor would it follow left/right commands from the control head. I phone Trio, and spoke with one of their technicians. He diagnosed the problem very quickly, and it turned out that I needed to move one of the wires to a different pin on the control head. Once I did that it worked perfectly.
For the record, the Navaid servo is connected to the Trio Pro Pilot control head as follows:
    Navaid red wire   <--> Trio pin 1
    Navaid green wire <--> Trio pin 2
    Navaid black wire <--> Trio pin 4
    Ground            <--> Trio pin 5

    Note: If shielded wire was used for
          the Navaid, connect pin 5 to
          the shield instead of ground.
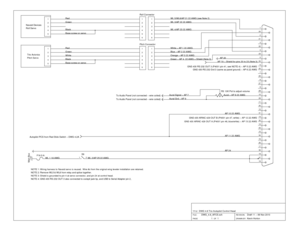
You can better see all the details in the pdf version of my Trio Autopilot wiring diagram.
Autopilot Wiring 99% Complete
- Details
- Written by Kevin Horton
- Hits: 3124
I got out to the hangar for a little while on Friday, and found one wiring error on the autopilot. The roll servo would engage after fixing that error, but it wouldn't respond to left or right commands from the control head. I called Trio tech support after they opened (they are in California, three time zones away). Their support guy identified the problem very quickly. I'm using my original Navaid Devices roll servo, which is compatible with the Trio autopilot. But, Trio doesn't provide a wiring diagram showing how to hookup the Navaid servo to their autopilot. I contacted Trio a few weeks ago by e-mail, and one of the owners described how the Navaid servo needed to be connected to the autopilot control head. But, it turns out that he gave me bad info. Or maybe I misinterpreted what he sent me. The tech support guy said that I needed to move one wire to a different pin in the connector at the autopilot.
I spent much of Saturday at the hangar, working on the autopilot wiring. First I fixed the roll servo wiring, and tested it. It worked perfectly now. I also connected the pitch servo, and tested it too. Next I hooked up the disconnect button from the control stick. That was a bit of a job, as I needed to move two wires on the relay that did the same job for the old Navaid wing leveler, and that relay was a bit of a trick to reach. But I got it done, and the disconnect button works.
As it sits now, all the autopilot wiring is complete, except for the disconnect aural tone input into the audio panel. I need to open up the intercom connector to see if it has removable pins, or if the wires are soldered to the pins. If the wires are soldered I'll drop the idea of hooking up the aural input from the autopilot, as I'm afraid I'd cook the connector and have to redo the whole thing. I need to hookup the pitot and static lines to the autopilot, and then I need to put the seats and rear baggage compartment back in. Then I'd be ready to fly again, if only I had four good cylinders.
