Annual Inspection Progress
- Details
- Written by Kevin Horton
- Hits: 2907
I spent most of the day at the hangar today, and made good progress on the annual inspection. I found a few little things that needed sorting out, but no major issues so far.
The biggest thing I found was some blue stain on top of the gascolator around a plugged off hole. There was obviously a bit of fuel leaking there. The problematic plug was made from aluminum, as is the gascolator, so I didn't want to torque it too tight for fear of galling. I purchased a brass plug in the aviation aisle at Canadian Tire, put some Fuel Lube on it, and torqued that guy real tight. I'll pull the wing root fairing off after a few flights to confirm the leak is no more.
Another thing I found was a bit of rubbing of the aluminum brake lines against the top edge of the landing gear leg fairings. I repositioned the two lines a bit to hopefully address that, but I'll take another look at this in a few flights too to make sure the fix is doing the job.
I also noted some minor rub marks on the front seat belts where they are touching the front seat back. I'm not sure yet how to best sort this one out, but I can't leave it alone as the seat belt would eventually be damaged, and these things aren't cheap.
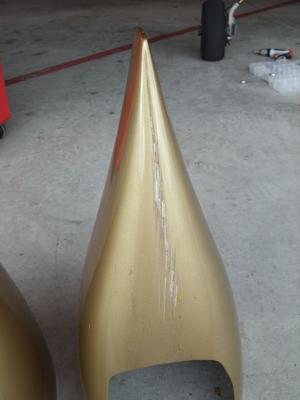 The bottoms of both wheel pants are scraped up a bit, the left one, seen here is much worse than the right. This is almost certainly from when I taxied from the taxiway to the grass at Muskoka early this summer. I should have stopped on the pavement and checked the surface out rather than just pressing on. Lesson learned. The damage is only cosmetic, and won't be noticed when the wheel pants are on the aircraft, so I'm going to leave it alone for now.
Ron T., who owns the hangar my aircraft is in, helped me re-torque the main landing gear bolts. Thanks Ron. This job went much better than last year, as I am starting to get the hang of it. It went so well I didn't teach Ron any new words. When I built the aircraft, I put the big bolts on the outboard end of the gear legs in with the bolt heads up, so the nuts can be torqued from below. The plans show these bolts in with the nuts on top, but it is pretty much impossible to get a torque wrench on the nuts, thus you must put the torque wrench on the bolt head. This makes it impossible to get a reliable torque value due the friction of turning the bolt through the thick U-clamps. This year I discovered that I can get a 1/4" drive socket and ratchet on those bolt heads, which is much, much easier than the universal joint and long extension I used last year. Three of the big bolts at the outboard edge of the landing gear legs were very slightly under torque, so this job does need to be done annually as Van calls for.
Back Home
- Details
- Written by Kevin Horton
- Hits: 2598
I got back from a week in London yesterday afternoon, and hopefully that will be the last big trip until November. Terry left for Green Bay this morning to help a sister who had double knee replacement. So, while Terry is away, I'm going to spend as much time as possible at the hangar, doing the annual inspection on the aircraft and installing the new autopilot.
I would have loved to have gone flying this afternoon, as it was a beautiful fall day. But, the annual inspection expired while I was on the road, so that wasn't and option. Oh well. I did get a good start on removing all the inspection panels, cowling, etc, but I eventually ran out of steam as I'm still fighting the five hour time change from London. I plan to spend most of tomorrow at the hangar, and should finish opening the aircraft up, and start the actual inspection.
On the Road Again
- Details
- Written by Kevin Horton
- Hits: 3020
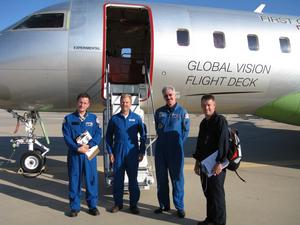 I was on the road for the last ten days doing avionics flight testing, getting back from Wichita early this morning. Just enough time to do laundry and repack, and I'll be off to London late this evening. It's been a busy few weeks, but things should slow down after I get home. Then I'll spend quite a bit of time at the hangar doing the annual inspection and installing the Trio Pro Pilot autopilot.
Airspeed Error - With and Without Paint
- Details
- Written by Kevin Horton
- Hits: 4517
 Shortly after the aircraft was painted, I did some airspeed error tests to check the airspeed error at three different speeds. I crunched the hand recorded data, and it seemed to show that the airspeed errors had changed about a knot when the aircraft was painted. I did four more test points a few flights later, but I got busy and never took another look at things.
I was in Wichita all last week, from Sunday to Sunday, and used the tiny bit of spare time I had to do a deeper analysis of the data I recorded on my laptop for these two flights. I found that the data recorded on the laptop differed somewhat from the hand recorded data. I analyzed the laptop data in exactly the same way as I had analyzed the data from the original tests, so the results are directly comparable. The latest data seems to show that the airspeed error is broadly similar to what I measured before the aircraft was painted. But, the latest data isn't quite as clean as the original data, so I will try to get some better quality data sometime in the future to put this question to bed.
Cruise Performance Test Results
- Details
- Written by Kevin Horton
- Hits: 7243
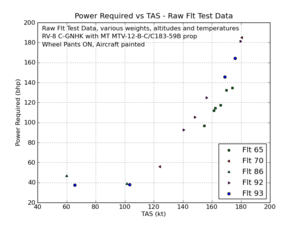
I've gathered cruise performance data on several flights since the aircraft was painted. I've flown at various weights, altitudes and temperatures, so the raw Power Required vs TAS is a bit of a mess.
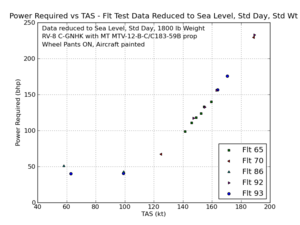 I corrected all the test points to standard conditions (sea level, 15 deg C temperature and 1800 lb weight). The corrected data now starts to show a nice trend of Power Required vs TAS.
The classical equation for power required vs speed for propeller-driven aircraft can be transformed so the vast majority of points should fall on a straight line. If you plot power required times speed vs speed to the fourth power, the data should make a nice straight line except for points very close to the stall, or at higher Mach numbers. The drag increases significantly just before the stall due to airflow separation, and it also increases at higher Mach numbers due to wave drag. Note: this analysis assumes the propeller efficiency is constant. This is certainly not true, but it is a very useful simplification, and the evidence from my testing seems to show that the results are still reasonably accurate.
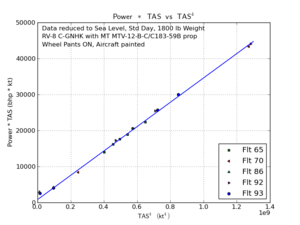 The RV-8 is sadly incapable of Mach numbers where wave drag would be a factor. But, I think the data shows some drag increase at speeds close to the stall. The slowest speed on this plot was extremely close to the stall. The IAS was about 6 kt below the IAS for stall with power off, but the engine was running at medium power to hold level flight, and the prop wash kept the inboard wing (where the stall normally starts) flying. I was on the ragged edge of stall buffet, which means I must have been about one knot above the stall. The next slowest point was a bit further from the stall, but still seems to show a drag increase above the straight line fit through the other points.
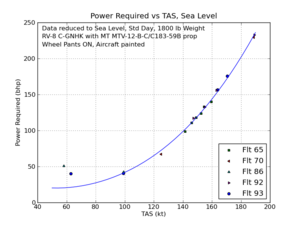 I took the equation for the straight line through the power required times speed vs speed to the fourth power points, and transformed it back into power vs speed.
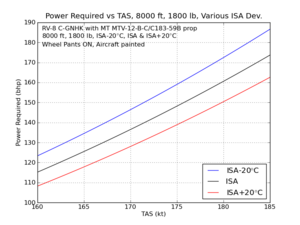 I then corrected this to get predicted performance at 1800 lb weight at 8000 ft at various temperatures.
I did a tiny bit of cruise performance testing with the original Hartzell prop before I trashed it in the overspeed event. The results of that testing showed that the speed at 75% power at 8000 ft was within a knot of Van's advertised performance. But, I lost about five knots when I switched to this MT prop. Oh well. I can cruise close to 180 kt if I want to burn 12 gph of fuel with mixture set for best power. Fuel is expensive, so I usually cruise between 160 and 165 kt, burning between 8.0 and 8.5 gph running with mixture lean of peak EGT. Not bad.
I'm working on a couple more articles for Kitplanes magazine - one on determining engine power, and cruise performance testing. I've finally got enough data to convince me that the engine power determination and cruise performance methods are working well, so I'll finish off those articles soon.
Tailwheel Issues Resolved
- Details
- Written by Kevin Horton
- Hits: 4419
I took the tailwheel apart again this week to study it more closely. I compared the JD Air Parts control arm to the original Vans arm I had used when I was using chains and springs. The tailwheel steering had worked perfectly with the original Vans arm, but I changed to the JD Air Parts Tail Link as the chains were hitting the bottom of the rudder. I had put some clear flexible hose over the chains to protect the rudder, but it seemed like it was just a matter of time before the paint got banged up.
I noted that the slot for the lock/unlock plunger was not quite as long on the JD Air Parts arm as it was on the Vans arm. Also, I noted that the sides of the slot on the JD Air Parts arm were not quite parallel - the slot was wider at the open end than it was at the closed end. Also, the corners of end of the plunger had a bit larger radius than optinum. The combination of these three things meant the plunger tended to retract when pushing left rudder.
The replacement plunger that I purchased from Flyboy Accessories arrived this week. It had smaller radii on the corners than my plunger, so I switched to the new one. I did a bunch of taxiing around and a short test flight, and the tailwheel worked perfectly.
Update - I reported the issues with the control arm to JD Air Parts. I just got a reply saying that they were aware of the problems, and that they expected to receive new, improved parts from their contract manufacturer this week. They will send me a new one to try out.
