Hawk One Now in Golden Hawk Colours
- Details
- Written by Kevin Horton
- Hits: 4757
I learned on Friday that Vintage Wings Sabre has returned from CFB Cold Lake, where it was painted in an RCAF Golden Hawks paint scheme. The pictures look absolutely gorgeous. The Vintage Wings facility is just across the river from Ottawa, in Gatineau. I’m trying to arrange a visit to take some pictures. I’m also trying to contact the paint team to see which gold paint they used, and to see if they have any computer graphics files that define the various elements of the paint scheme. If I can get those, that would save me a lot of work creating files to drive a vinyl cutter to make stencils.
More info on the Hawk One blog.
Steady Progress
- Details
- Written by Kevin Horton
- Hits: 3309
We had another warm spell mid-week, so I took Tuesday, Wednesday and Thursday off. As usual, most days were classical “two steps forward, one step back”, but I made steady progress. The major accomplishment was to get all the inverted oil system hoses installed. Those hoses are very large and stiff, especially in the cold, so it was not easy to get the ends properly aligned with the fittings. Also, I had to manufacture one new hose, due to the different inverted oil pickup that Aero Sport Power installed for me.
I also got most of the fabrication work done for a baffle crack repair. I did manage to screw up that plan somewhat though, as I somehow had the wrong drill bit installed, and drilled #19 holes when I should have drilled #30 to take 1/8” rivets. I could use 5/32” rivets in those too large holes, but I am concerned that the much greater force required to set those rivets would deform the baffle piece. I’ve ordered some structural #8 screws to use instead. Hopefully they will arrive late this week. I will probably eventually order another baffle piece and redo this job.
I spent much longer than expected getting the throttle cable rigged. I suspect that when I put in the new throttle cable (the original had gotten damaged from heat radiated from the exhaust system), I must have not screwed the throttle lever rod end on all the way. When it came time to hook the other end of the cable up to the throttle arm on the fuel injection servo, I had a very difficult time getting it rigged so it would go to full travel in both directions before the throttle lever in the cockpit hit one of the stops. I eventually got it sorted out by putting all adjustments at the absolute end of their travel, and moving the lock washer to the other side of the bracket, but it took over an hour of fiddling around. And now I have decided that I really should have put a piece of fire sleeve over the throttle cable where it passes close to the exhaust system. I did add a heat shield there, but the insulation provided by a piece may provide a longer service life. I’ll disassemble things next time I am at the hangar and add the fire sleeve. While I am at it, I will see if I can spin the inner moving part of the throttle cable to it to screw a bit deeper into the rod end at the throttle lever end. It is such a horrible task to get the rod end pin installed at the throttle lever end, that I don’t want to disassemble it there. But, if I loosen the jam nut, maybe I can spin the inner part of the cable from the engine end, and have it screw a bit further into the rod end.
The weather forecast for Saturday changed daily. I woke up early, and checked the temperature and forecast. It was currently -16 deg C, with a forecast high of -16 deg C. It had been warmer the past few days, so I hoped that the interior of the hangar would actually have retained some of that heat. I got to the hangar around 8 AM, and found that it was -19 deg C inside. Ouch. I wasn’t about to give up, so I fired up the heater and started working. It was difficult to keep the hands warm, but I managed to get several hours of productive work in. In the end, the temperature fell for most of the day, hitting -23 deg C in the middle of the afternoon - the daytime high was at 5 AM. I got the mixture cable bracket and bellcrank installed, and the mixture control rigged. I then slid the alternator and starter cables on top of the mixture cable attach bracket, and secured them in the same way I had done them the first time. But, last night, I realized that there was a much better, more secure and durable way to do this, so I will redo this job next time I am at the hangar.
The current weather forecasts show another warm spell coming late in the week. I’m about one day of work away from starting to install the prop.
PCU Prop Governor vs Van's Prop Governor Cable Bracket
- Details
- Written by Kevin Horton
- Hits: 4644
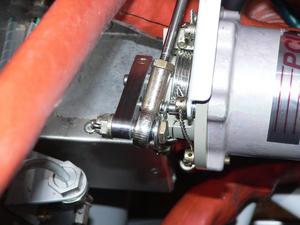
I got a bunch more work done today. The first event, which took over two hours, was to redo the prop governor cable attachment to the prop governor. I bought an Aero Technologies PCU5000X prop governor, as part of a group buy organized on the Van’s Air Force Forums. I had assumed that the back of the governor would be the same as other common prop governors, which all seem to the same bolt pattern. I’ve got a Vans prop governor cable bracket, that bolts on the back of the prop governor. It turned out the PCU prop governor has a slightly different bolt pattern, so you need to slot two of the holes on the bracket (more info). And, the radius on the inner edge of that bracket interferes with a raised area on the prop governor, so you either need to remove a bunch of material on the bracket, or put a spacer under it. I elected to use a spacer. Then, you find that you can’t get the bolt in with the bolt head forward, and there isn’t room for the nut if the bolt head is aft. I initially attempted to solve that problem my moving the governor cable rod end to the other side of the control arm on the governor, but that meant the rod end was at quite an angle, which didn’t seem like a good long term solution.
Last night, I woke up in the middle of the night with the realization that I could solve the bolt clearance problem by removing the control arm on the governor. That would allow me to insert the bolt with the bolt head forward. The problem with this approach is that you must ensure that you put the control arm back on with the same orientation on the shaft.
Here are the steps required to do this, in case anyone else has this problem:
- Figure out how far the rod end needs to be threaded on the governor cable end. In my case, I threaded the rod end almost all the way in.
- Ensure there are alignment marks on the control arm and the shaft, to help you reassemble them with the same orientation.
- Bend the locking tabs that secure the bolt in the control arm.
- Remove the bolt in the control arm.
- Slide the control arm along the shaft a little ways.
- Grab the end of the spring that pushes on the control arm, and disconnect it from the control arm.
- Remove the control arm.
- Insert the bolt through the rod end and the control arm. You should have a large capture washer next to the bolt head, then one of those tiny little rod end clearance washers. There should be another tiny rod end clearance washer between the rod end and the control arm.
- Put the control arm back on the shaft, but don’t slide it all the way one yet.
- Put the spring back on the control arm. I used a loop of safety wire to pull on the end of the spring.
- Slide the control arm back in place, and check your alignment marks to confirm you have it properly lined up on the shaft.
- Insert and torque the bolt on the control arm. It has a small head, but is actually a 3/16” bolt, so 25 in-lb is a good torque value.
- Bend the tabs to lock the bolt in place.
This afternoon I got a bunch of other details done, but there is still several days of work left. It looks like the warm spell will last at least until Thursday, so I'm taking the next two days off too.
Engine Reinstallation Progress
- Details
- Written by Kevin Horton
- Hits: 3405
I took all of Monday, plus Tuesday afternoon off from work. The temperature plummeted on Wednesday, and the rest of the week was too cold to attempt any hangar work.
I ran into a problem with the prop governor cable bracket, as described by other builders here. I added a spacer between the PCU5000X prop governor and the mounting bracket, then attached the rod end on the face of the control arm that is furtherest away from the prop governor. That worked, but it isn’t the perfect solution, as it means the rod end is not very well aligned with the axis of the prop control cable. I need to take another look at this the next time I’m at the hangar. I need to sort this out fairly quickly, as the access to that area will be much worse once I get the rest of the stuff reconnected back there.
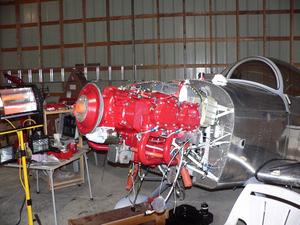 I got the engine back on the engine mount on Monday, and made a good start on the various connections between the engine and airframe. As I expected, the change in the inverted oil system pickup meant that the original oil hose is too short. I ordered a new section of hose, and it arrived on Friday.
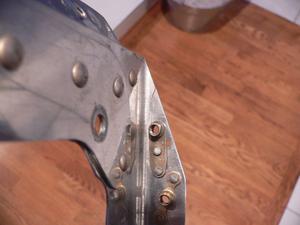 I discovered two cracks in the baffles near where the oil cooler attaches. That is a common problem, and I had reinforced that area, but now that I look at things with fresh eyes I can see that all I didn’t account for where the oil cooler loads had to pass to get to the engine.
One of the cracks (shown here) is at the aft end of the side baffle wall, where the flange bends. I’ll cut off the flange, and rivet on a piece of angle and a doubler.
The other crack is on the flange where the plenum top attaches to the rear baffle wall, and I haven’t yet figured out the best repair. I had thought that the plenum top would serve as a reinforcement for the rear baffle top, but I obviously didn’t properly size the mounting flange to carry the loads. I’m not sure whether to add a brace between the baffle side and rear, or to beef up the plenum top mounting flanges, or to do both.
Whither the Weather?
- Details
- Written by Kevin Horton
- Hits: 2474
I was fighting a cold the first few days of the week, then it turned cold, so I haven’t gotten any project work done since last weekend. The only progress made was that Jim M. helped me take the MT prop to the hangar yesterday.
It is supposed to warm up the next two days, so I will take time off and attempt to get a good part of the way through the engine reinstallation. Then it is supposed to turn quite cold for two weeks or so (-30 deg C forecast overnight Wednesday night), so I may have to put things on hold again until we make it through that cold snap.
Slow Progress
- Details
- Written by Kevin Horton
- Hits: 3382
Terry and I drove down to Green Bay, WI for 10 days over Christmas and New Years. Terry grew up in Green Bay, and has five sisters in the area that she is very close to. I kid her that I married her so I would have some place to stay when going to the EAA convention at Oshkosh :). It was good to visit with the herd of sisters, but it was wonderful to get back home on Friday and be sleeping in our own bed.
I did get the full Lambeau Field experience while in Green Bay. We did a Lambeau Field tour, which included a walk out the tunnel where the Packers come onto the field at the start of a game, and a visit to the Packers Hall of Fame. Then lunch and a beer at Curly’s, named after Curly Lambeau, the founder and first coach of the Packers (and also a player on the team). And, on the 28th, I went to the final Packers regular season game. It wasn’t as bad as the Ice Bowl, but it was fairly brisk. Chris C. - tell Joan that I had a beer in her name. She can pay me next time I am in Vancouver :)
The Aero Technologies PCU-5000X propeller governor arrived over the Christmas break, so I now have all the major pieces in place to allow me to start putting the aircraft back together. I went out to the hangar this morning to meet local RV builder Chris H., who dropped off Mike B.’s travelling engine hoist. Thanks Chris and Mike.
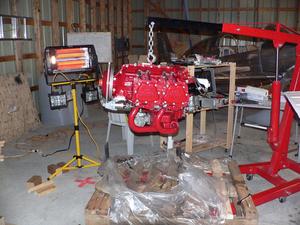 At the start of the morning, I had grandiose hopes of getting the engine bolted back onto the engine mount by lunch time, but my actual pace was way too slow to get that far. I picked the engine off the pallet, and then spent way too much time trying to deal with what turned out to be a non-problem. I eventually realized that I had gotten confused between the prop governor mounting pad, and the mounting pad for the vacuum pump (which I am using for a B&C Specialties SD-8 8 amp alternator). I eventually figured out my mistake, and worked on installing the prop governor. I found out that the base of the PCU-5000X comes much closer to the mounting nuts than on my previous MacCauley prop governor. That meant that my sockets wouldn’t fit over the nuts, and I didn’t have a 1/2” crowfoot wrench. In the end I decided it would have been a lot easier if I had simply removed the oil filter, as it greatly hindered the access with my cobbled together makeshift torque wrench/open end wrench combination.
I stopped work at lunch time after finishing torquing the prop governor, and came home to warm up (it was -16 deg C inside the hangar, or +3 deg F). It is supposed to warm up later in the week, and I hope to get another work session in some afternoon.
