Trois-Rivières for Lunch
- Details
- Written by Kevin Horton
- Hits: 1882
Today was an absolutely gorgeous day. Bright sun. Not a cloud in the sky. The temperature hit 16 deg C (61 deg F). Terry and I flew to Trois-Rivières, Quebc (CYRQ) to meet John, a coworker, for lunch. His aircraft is based in Ottawa (CYOW), and ours is in Smiths Falls (CYSH). He was cruising at 120 kt, and we were at 160. But, we arrived at Trois-Rivières less than one minute apart. The airport restaurant was packed - we got the last table big enough for the five of us (Jim, the co-owner of the C172, and his wife also came along). The food was great.
The wind was really blowing at altitude - about 45 kt out of the west, so we cruised at 160 kt at 55% power at 9,000 ft on the way there, to let the wind do some of the work and save some fuel. On the way back, we went a lot lower, and pushed it up to 175 kt.
I was happy to note that #1 CHT is now in the middle of the pack, whereas it had been much lower than the others. Clearly the work I did to clean up the connection in the #1 CHT wire was what it needed. Now all four CHTs are within 30 deg F of each other. Not perfect, but close enough for now.
The fuel flow indication appears to be much more stable than it was before. It still moves once in a while, but the movements are much less frequent and of smaller amplitude than they were before. I’m looking forward to a flight where I record data, so I can see how much of this apparent improvement is real.
The work I did to seal drafts from the canopy seal seems to have made a big difference. We identified a couple of improvements that could be made to the air dam. Terry is going to make a new, improved version. I’ll post pictures once I have the final configuration.
The plan I had to run a SCAT tube to the rear seat to duct heat back there didn’t work out. I’ve got three large aluminum eyeball vents in the aircraft - two that provide fresh air, and the third that provides one of the two hot air supplies. I thought all those eyeball vents were identical, so I measured the easiest to reach one before ordering the SCAT tube - it had an outer diameter of 2 inches. But, when I tried to put the SCAT tube on the hot air eyeball, I discovered that this one was actually 1.75 inches in diameter. Drat. I’ll order a new piece of SCAT tube.
Fuel Flow Transducer Moved
- Details
- Written by Kevin Horton
- Hits: 4143
The heat shield I needed to finish the fuel flow transducer work arrived this week, so I zipped out to the hangar early Saturday morning to finish the job. I also put in a new flexible fuel line from the fuel filter to the fuel pump inlet. The fuel flow transducer had been plumbed in between those two items, and I had temporarily connected those two lines with a union. But I knew that I would have a more reliable system if I could get rid of any extra connections, and I happened to have a flexible line in the basement that just happened to be the right length, so I put it in. I had feared that replacing the line would be a horrible job, as the input to the fuel pump is buried on the back of the engine, absolutely surrounded by inverted oil system lines, heat muff SCAT hose, throttle cable, etc. But, once I disconnected the heat muff SCAT hose, I just had enough access to get at the end of the hose.
I did a leak check using the boost pump, then put the cowling back on. I had planned a long cruise performance flight to check out the fuel flow indication, but I was running out of time to get back home so Terry could have the car. I almost decided to not go flying, but the wind was blowing 10 to 12 kt from the left, almost straight across the runway, and I didn’t want to miss any opportunity to expand the crosswind envelope. I did a quick circuit to a stop and go, then left the circuit for a quick check of the fuel flow as I leaned the mixture, then back into the circuit for a full stop landing. The fuel flow seemed to be much more stable than before, and the landings were quite acceptable.
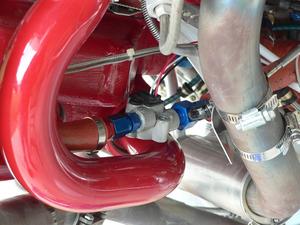
 Here is the fuel flow transducer, in its new location, between the engine-driven fuel pump and the fuel injection servo.
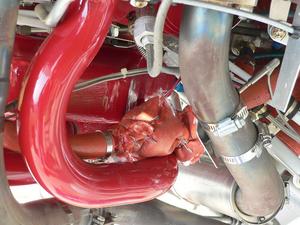
 Here it is after wrapping it in firesleeve. I’ll make up a new piece of firesleeve and put some RTV on the edges and let it cure before tying it in place. This was the first attempt - airworthy, but very ugly.
Misc Work
- Details
- Written by Kevin Horton
- Hits: 2777
I went out to the hangar early today, intending to do a bunch of work, then go flying. I spent a bit of time modifying some hardware to allow connecting the hangar plane mover to the tailwheel, as one of my hangar mates finds the aircraft hard to move around. I then installed a canopy air dam and weather stripping, in an attempt to stop the drafts that come by the back end of the canopy skirt. I also reinstalled some of the cockpit sidewall panels, as Terry had sewn on some Velcro strips to hold them in place.
Then I attacked moving the fuel flow transducer to get it between the engine-driven fuel pump and the fuel injection servo. That all went fairly well, but I decided that I should add a heat shield and some firesleeve before I fly. I’ve got firesleeve, at home, of course, but need to order a heat shield. So, no flight today. :( Hopefully I can get a heat shield here this week.
Low CHT Indication Fixed?
- Details
- Written by Kevin Horton
- Hits: 3405
I got a bit of free time to head to the hangar Wednesday last week, and attacked the CHT indication problem. I reseated the connectors between the CHT #1 probe and the extension wire that goes to the Engine Indication System. Then I rechecked CHT #1 and #3 in boiling water. Now both were showing the same temperature - about 10 deg F too low. Now that CHT #1 seems to have the same errors as the others again, it will be interesting to see how it compares to the other cylinders next time I get flying.
While I was at the hangar, I made a cardboard template of the area at the rear of the canopy frame. Terry will use the template to make a removable cloth screen that will be part of a scheme to hopefully stop the air drafts coming from under the canopy skirt. Hopefully we can try it out this coming weekend.
I pulled the passenger seat cushions out and brought them home, so I could install a heated seat kit. But, I learned that the leather seat covers are glued to the foam cushion. So, it will not be possible to install the heated seat kit. Terry has a 12v electric blanket that a friend gave her - we will try that next time we go flying.
I was on the road from Thursday until late this afternoon, so nothing got done on the aircraft. I did take the time for an editorial cleanup on the POH.
First Away Trip
- Details
- Written by Kevin Horton
- Hits: 2879
It’s been a good RV weekend. Yesterday, I took one of my coworkers for a short local flight. It was the first time he had been upside down for a good number of years. After we landed, I plugged the engine preheat into a timer, so it would start its magic at 7 AM on Sunday, as it was supposed to get well below freezing overnight.
Today, Terry and I zipped out to the airport and launched for Lindsay to have lunch. The engine was nicely warmed up by the Reiff preheater, and we wasted no time in getting airborne. It was a beautiful day to go flying, and we took about 50 minutes each way (126 nm), and had a very nice lunch. It was the first time I had been more than 25 nm from Smiths Falls, and the first time we had done anything “useful” with the aircraft. The main point of the exercise was to get a slightly longer flight, so Terry could see if there were any more issues I needed to address before we do longer flights.
She confirmed that there is a draft coming up around the rear seat stick. I’ll try putting some vinyl tape where the wing spars go into the centre section, and I’ll get a stick boot made. She confirmed my suspicion that there is a draft from the rear end of the canopy skirt. I have a plan for that, and I’ll report once I’ve had a chance to try it out. I’m also going to run a 2” SCAT tube from the hot air outlet on the back side of the front baggage aft wall to route it to the rear seat. And, I’ve got a line on a heated seat kit that I will try to put in the rear seat.
We forgot the camera, so no pictures.
Low CHT Indication Musings
- Details
- Written by Kevin Horton
- Hits: 3371
I've done some thinking about this, and I wonder if the low CHT #1 indication could possibly be due to excessive resistance somewhere between the CHT probe and the engine monitor. Each CHT probe is connected to about 18" of metal shielded cable, then each of the two wires per probe has spade connectors that connect them to extension wires that go to the engine monitor. The CHT probes are thermocouples, and if there is a high resistance at one of those spade connections, it could lead to the engine monitor sensing a lower voltage than the CHT probe is actually creating.
Next time I have the cowlings off, I will inspect and reseat the spade connectors for the #1 cylinder, then I'll check it in boiling water again. If that doesn't do it, I'll disconnect the #1 and #3 CHT probes at their spade connectors and trade them, and check with boiling water again. It'll be useful to see if the problem follows the probe, or if it stays on the #1 cylinder.
If the problem stays with the probe, I probably need to replace it. If the problem stays on the #1 cylinder, I'll pull the connector at the EIS and check for pins that aren't fully inserted. Pulling and reseating the connector should clean off any corrosion too. Next, I'll swap #1 CHT with another cylinder by moving the pins in the connector, to take all the wiring out of the picture. if the problem stays on the #1 cylinder after all that, I'll contact Grand Rapids, as I almost certainly have a failed engine monitor.
