Annual Inspection Complete
- Details
- Written by Kevin Horton
- Hits: 3898
I spent much of the day at the airport, and finally finished the annual inspection. I found and fixed a few little things, the most significant being loose connections on the starter power cable and the engine ground strap. These slightly loose connections may possibly explain why the engine wasn’t cranking quite as nicely as it big a year ago. We’ll see.
I also found blue fuel stain on the inboard end of the right fuel tank. There isn’t an active fuel leak, but there certainly was a leak at some time in the past year. I’ll keep an eye on that one. Hopefully it’ll make it through the winter, as it’ll be a lot easier to fix this in warm weather when Proseal will cure properly so I could deal with it without removing the fuel tank from the wing. I spoke with a multiple aircraft builder and Aircraft Maintenance Engineer who said that he had experience with fuel leaks that appeared to fix themselves. His theory is that the blue dye may eventually plug the leak.
I was concerned by a strange grey discolouration I found on the lower left engine mount and also on the starter cable that runs in the same area. It looked a bit like exhaust stain, but that area was a long ways from any possible exhaust leak. I was afraid at first that it might be a sign of a cracked cylinder, but the cylinder had no discolouration on it, and I couldn’t see any cracks. And, the discolouration wiped right off, unlike the exhaust stain that resulted from the broken exhaust leak I had last year. I eventually traced it to some fretting that is occurring between the front side of sliding oil cooler door and the oil cooler mount. The air flow that leaks between the front of the oil cooler door and the oil cooler mount would carry the small amount of aluminum residue from the fretting, and that air path comes out right next to where I saw the discolouration.
I advanced the ignition timing 5°. This model engine originally had an ignition timing setting of 25° BTDC. After a few years, due to issues with high CHTs in some installations, Lycoming suggested an optional ignition timing change to 20° BTDC. I set my timing to 20° before the first flight, and hadn’t changed it until now. My CHTs run quite cool, so I decided I would try 25° BTDC. In theory, there should be a bit more power with this ignition timing. I’ll do some performance testing to see if I can detect any difference.
I hope to get flying tomorrow morning. The weather should be good. Hopefully the runway won’t be too icy.
January Calendar
- Details
- Written by Kevin Horton
- Hits: 2960
 I got a surprise in the e-mail yesterday. Peter Lubig, the photographer who took the air-to-air photos of the RV-8 in October, occasionally creates calendar images from his photos. He used an image from that shoot for January 2012. I’m using it as my desktop wallpaper. You can download the full size version (2400 x 1500) here. Also available in 1920 x 1200, 1680 x 1050, 1440 x 900, 1366 x 854, 1280 x 800 and 1024 x 640 sizes.
Happy New Year!
- Details
- Written by Kevin Horton
- Hits: 2316
Happy New Year!
It’s been way too long since I last updated this site. December was a crazy month - on the road a bit for work, Christmas shopping, and on the road again for 10 days over Christmas.
I got a very good start on the RV-8 annual inspection, but have a few more items to do on the inspection checklist. The annual inspection was due at the end of December, so I need to finish it off before I fly again. I got some work done today, but ran out of steam before finishing it off.
Terry and I had a very enjoyable visit to visit my folks over Christmas in Yarmouth, NS. An extended trip by RV-8 is not workable in the winter - it is possible to pick a day to fly to destination, but there is no way to be sure of being able to return a week later. Airline travel in the winter can be frustrating, and driving can be a nightmare if you have the misfortune to hit a winter storm. So, we booked a sleeper cabin on the train. The train was pretty much on schedule, the service was outstanding, and we really enjoyed the views from the observation dome on top of the Park Car at the back of the train (360 deg view and Google Images). We caught sunset and sunrise both to and from Nova Scotia in the Park Car.
 View from the front seat in the observation dome on the Park Car, in northern Nova Scotia between Truro and Amherst.
Canopy Skirt Draft
- Details
- Written by Kevin Horton
- Hits: 5627
It was a bit brisk when I flew the aircraft on Monday, and I felt a very cold draft from the back of the canopy. Terry had originally complained about the draft from the rear of the canopy skirt hitting her on the back of the neck. I had tried putting weather striping between the bottom edge of the canopy skirt and the fuselage, but this proved ineffective. The aluminum fuselage, steel canopy frame and fibreglass canopy skirt all have different coefficients of thermal expansion, which means the fit between the canopy skirt and the fuselage changes with temperature. And, to make it even worse, the air flowing over the canopy lifts it upwards in flight.
I gave up on the weather stripping and copied an idea I saw on an RV-8 at Oshkosh - a horizontal fabric air dam that keeps the air that gets in trapped. Weather stripping between the curved tube in the canopy frame and the fuselage just behind the rear seat prevent this trapped air from making it into the rear seat area. My first implementation worked well for many months, but the adhesive on the stick-on Velcro eventually started to fail, allowing cold air to get around the edges of the air dam.
This time I used Velcro without adhesive, and glued it to the canopy frame with Goop glue. I used duct tape to hold the Velcro in place while the glue cured. It seems to be secure, but time will tell.
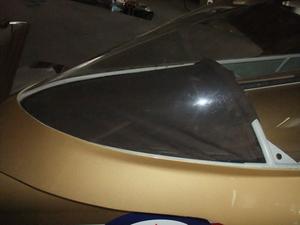 Here we see the air dam, held to the bottom of the canopy frame by Velcro.
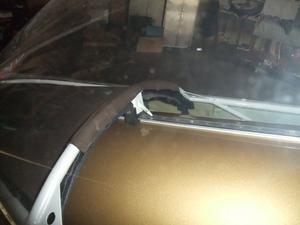 Another view of the air dam. You can see the weather stripping that seals just behind the rear seat, as the back of the canopy drops down as it closes.
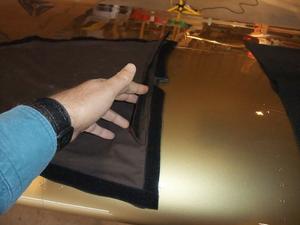 Here is the top of the air dam, laying on the wing before I reinstalled it. I’m not convinced the flap at the front is necessary, but Terry had a different opinion, she was the one sewing the dam, and it was the back of her neck that bore the bore the brunt of the air blast, so I didn’t argue with her.
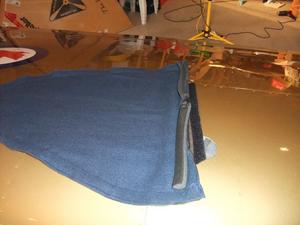 Here you see the bottom of the air dam, with some of the weather stripping that seals between the front of the air dam and the fuselage surface just behind the rear seat.
I also started working on the annual inspection. I’ll do it in zones over the next couple of weeks, doing one part of the aircraft at a time, and putting the aircraft back in flying condition at the end of each work session.
Installed 406 MHz ELT
- Details
- Written by Kevin Horton
- Hits: 3557
I had hopes to fly somewhere for lunch this weekend, but when I checked the logbook Friday night I discovered that the ELT had just become due for its annual recertification. I had purchased an ACK 406 MHz ELT, to replace the original one, but had never gotten around to installing.
It is still legal to keep using the old ELTs, for the time being. But, there is no longer satellite reception of emergency signals from the old ELTs. The only satellite coverage is for the newer, 406 MHz ELTs. The new ones also have the advantage of sending GPS position in the emergency message, so the Search and Rescue people have a very accurate position to head to.
I spent much of Saturday at the hangar, and got the new ELT mostly installed. The only really tricky part was the connector for the data cable from the GPS. The tiny little DIN connector supplied by ACK required the wires from the shielded cable to be soldered to four tiny little pins, and the body of the connector was plastic. I knew from bitter experience that my soldering skills were not up to task. Fortunately another Smiths Falls RVer, Ken T., was also installing his ACK E-04 ELT on the same weekend, and he is a master solderer. Ken had already soldered his connector to the data cable - he offered to give me that connector on a short length of cable, and I gave him my fresh connector. I had run the data cable under the floor when I installed the autopilot last year, so I spliced the two pieces of cable together.
I stopped work on Saturday when I couldn’t find the RS-232 line from the GPS to hook up to the front end of the data cable. I knew that my wiring diagrams would contain some important clues, but unfortunately they were at home.
Sunday, armed with my wiring diagrams, I quickly found the GPS RS-232 line and spliced it to the ELT data cable. I wired the power and ground for the GPS data decoder in the ELT, then did the functional test with an LED to confirm the ELT was receiving GPS data. It passed with flying colours - whew!
Cowling Back On
- Details
- Written by Kevin Horton
- Hits: 2477
After flying C-GOGO this morning, I went to Smiths Falls, reinstalled the cowling then did a short test flight. Everything seems to be good. Hopefully we’ll get some more good weather for the weekend so Terry and I can go somewhere for lunch.

