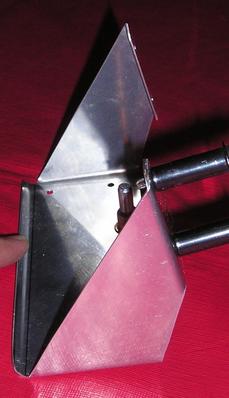
I attacked the mount for the Dynon remote compass sensor this week. I decided to fold the mount from a piece of sheet, as that should be lighter and stronger than making it from several pieces. I drew up a prototype on a piece of paper, folded it up and crawled into the rear fuselage to see how it fit. The first one had an interference problem with the static line, and the second one had another issue, but the third paper prototype looked promising. So I traced it onto some 0.032 sheet, cut it out, polished the edges and folded it up. It seemed to fit well when I held it in place
 The installation instructions say to get the remote compass sensor aligned within 0.2° of the EFIS, on all three axis. I had carefully measured how level the fuselage was and determined that it was leaning to the right by 1°, as the garage floor slopes towards the garage door. So all I had to do was use my digital level to align the compass mount 1° off level when I drilled the holes. Wonderful plan, except I leaned it the wrong way. so it ended up 2° out of alignment with the EFIS. I could have used a 0.312" shim, but it would have bugged the heck out of me.
So I made another mount and carefully drilled it in place. It must have moved a tiny bit as I drilled it, as it ended up being about 0.7° out of line, but I could live with a 0.063" shim under the right side of the sensor. Then I finally measured the alignment in pitch. I had thought that the alignment in pitch would be a simple matter, as I had measured the orientation of the bulkhead and determined that it differed by 10° from the EFIS. So I made the mount to sit at a 10° angle. Well, the top of the bulkhead seemed to be tilted forward just a bit, so I needed a 0.063 shim under the front of the sensor. OK, what's one more shim at this point.
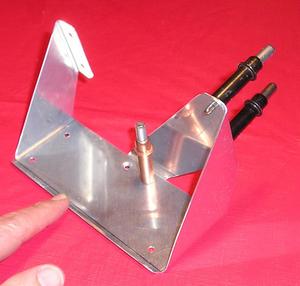 Then I tried a trial install of the mount with the compass sensor bolted in place on top of those shims. Horror - I found that the shims lifted the front of the sensor high enough that the cable connector was rubbing on the bulkhead. I had made the bracket as short as possible so that it would be stiff, and only allowed a small amount of room between the connector and the bulkhead. But I hadn't envisioned the possibility of shims.
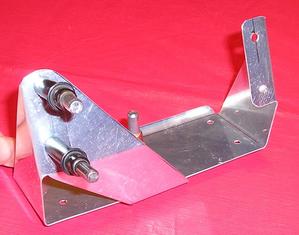 So, I made yet another bracket, a bit longer. And I measured the last one so I could drill the mounting holes on the bench, where I had better control of the drill. The alignment worked out almost perfect laterally, and I may need a 0.020" shim to adjust it in pitch. The new bracket was longer to make lots of clearance between the bulkhead and the connector, so I added a diagonal brace to stabilize it. I'll prime it when warm weather arrives and bolt it in place with brass (i.e. non-magnetic) bolts.
I also make up the first end of the connection cable today, but I have yet to string it from the aft fuselage to the instrument panel area.