We've had company visiting for a few days, so I haven't gotten any work done on the project since the middle of last week.
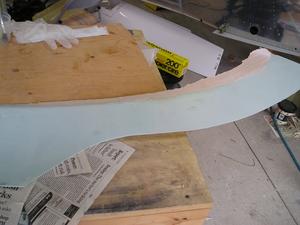
The canopy skirt has been a real bear to fit. The first attempt, many, many months ago, caused me to give up in disgust as I could not get a good fit on the rear portion. The crux of the problem is that there is quite a bit of aircraft to aircraft variation in the canopy shape (it is free blown, so every canopy is a bit different), and how the builder fits the canopy to the aircraft. But the skirt is made in a mold, designed to fit some mythical nominal aircraft. There is an angled flange at the top of the canopy skirt, where it fits against the bottom part of the canopy. On my aircraft, the angle on the flange is too great, which forces the bottom part of the skirt away from the fuselage skin.
I tried Plan B recently, which involved filling in the holes I drilled in the aft part of the skirt, and redrilling them. At first it looked like I had an acceptable fit, but in the end I was still unsatisfied, as there were several areas where I could still slip my fingers between the bottom of the skirt and the fuselage. Plan C involved using a heat gun to try to soften the fibreglas so I could change the angle on the flange at the top of the skirt. This didn't work, as it seems that the material the skirt is made from must get really, really hot before it becomes soft. I ended up turning some parts of the skirt brown from the heat, and causing some delamination, but I still couldn't change the angle of the flange.
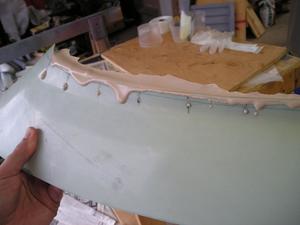
 So I decided that I needed to make a new aft skirt, that fit my aircraft. I covered the lower part of the right side of the canopy with electrical tape, and put a bunch of wax paper on the fuselage. Then I put some filler on the canopy skirt flange where it met up with the canopy. I taped the canopy skirt in place, making sure it matched up against the fuselage. The filler on the flange hardened, giving me a one-sided mold that had the flange at the right angle. The filler didn't stick to the electrical tape, so I was able to pop the skirt right off and clean it up.
Plan D - I put electrical tape on the inside of the skirt, and laid up one layer of fibreglas cloth on it. This didn't work, as the electrical tape pulled free from the skirt as the fibreglas resin cured, so the new layer had some large, weird lumps in it. Plus the single layer was really too flexible to work with. One for the trash can.
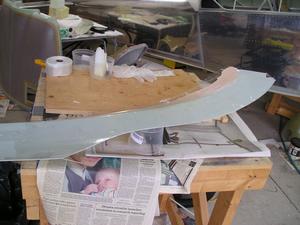 Plan E - I put clear packing tape on the inside of the skirt, and laid up two layers of 2" wide fibreglas cloth. I used the narrow strips of cloth, as I found it too difficult to work with a large area of cloth the first time I did this.
Plan E looks promising. I popped the new skirt off, and it fits very nicely. Tonight I cut the aft portion off the original skirt, and bonded it to the new skirt with a 2" strip of fibreglas. Tomorrow I'll check the result then lay up another couple of layers of cloth on the new skirt to make it stiff enough. If the right side turns out OK, I'll do the same thing on the left side.
